bookmark_borderquindip: problems with beans containing references to Notes objects?

I tried desperately to maintain references to Notes objects within a bean.

I always got a stupid error, either 500 or serialization error…

then I stumbled across this excellent article.

Solution Summary:
don’t use “view” for bean scope if you need to serialize notes objects! use session or request scope.

Stupid!!! really stupid!!!

but now I got my stuff working

Michael

bookmark_borderquindip: handle onKeyPress event server side (sort of ;-) )

Did you ever need to “catch” a key event? I did! Using the type-ahead feature i wanted to fill some fields depending on the selected value from the type-ahead field.

Now I used the “onBlur” event first. But that would require the user to move the focus away from the field with type-ahead.

I was looking for a solution where immediately after hitting <enter> the fields below would be filled.

Turns out this is pretty easy:

use two onKeyPress event handlers: one client-side, one server-side:

client-side:

if (thisEvent.keyCode==13) {
      return true;
}else{
      return false;
}

server-side:
call whatever functionality you need! in our case it’s a bean populating dependant fields


the client-side piece of code checks for <enter> and calls the server-side functionality only on <enter>

bookmark_bordermake sense of “flags” in your mail

Something about the mail template I don’t like: how colors are used.

they can be used to colorize mails from certain senders, I don’t see the point of it, i have the by Person view for that or I could use a rule to move emails from a particular group to a folder.

I would like to use colors for my “flagged” mails. Now you can, well you always could, maybe you simply didn’t know how. Let me explain it to you.

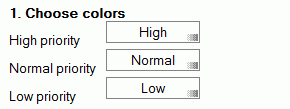
Create a form in a database. Add 3 color fields to it like this:

add a button with this formula:

Dim ws As New notesuiworkspace
Dim session As New notessession
Dim db As notesdatabase
Dim docProfile As notesdocument, docCurrent As notesdocument
Dim strformula As String
Set db = session.currentdatabase
Set docProfile = db.getprofiledocument( “colorprofile” )
Set docCurrent = ws.currentdocument.document
strFormula = {S_1B :=  “} + docCurrent.GetItemValue(“High”)(0) + {“; S_1F :=  “00000000”; S_2B :=  “} + docCurrent.GetItemValue(“Normal”)(0) + {“; S_2F :=  “00000000”; } _
+ {S_3B :=  “} + docCurrent.GetItemValue(“Low”)(0) + {“; S_3F :=  “00000000”; } _
+{ color1 :=  S_1B   :   S_1F ; color2 :=  S_2B  : S_2F; color3 := S_3B  : S_3F; } _
+{ colorDefault := “FFFFFFFF” : “00000000”; } _
+ { @if( “1” = FollowUpStatus ; color1; “2” = FollowUpStatus ; color2; “3”  = FollowUpStatus ; color3; “” ) }
Call docProfile.replaceitemvalue( “$Sender1”, strFormula )
Call docProfile.save( True, True )
Print “Chosen colors for flags have been set”

Send the form to yourself (maybe with a button and a formula like this):

Dim ws As New notesuiworkspace
Dim session As New notessession
Dim db As notesdatabase
Dim docCurrent As notesdocument

Set db = session.currentdatabase
Set docCurrent = ws.currentdocument.document
Call docCurrent.replaceitemvalue(“Subject”, “Use colors for flagged mails” )
Call docCurrent.ReplaceItemValue(“Form”, “frmMailColors” )
Call docCurrent.Send( True )

I guess the rest you should figure out yourself how it works. I posted this tip on our intranet yesterday and got immediately tremendous feedback. Well I didn’t go into details, I just let our users know their mail could look like this: (notice the little flag icons and how the whole mail changed it’s color! Now the “flags” for mails finally make sense!)

bookmark_borderindip: really cool type-ahead

this time just a link to share with you guys out there.

A REALLY, did I make this clear? REALLY REALLY cool fancy way to make type aheads the way I need them:

http://www.timtripcony.com/blog.nsf/d6plinks/TTRY-7XD5P9

kudos to Tim Tripcony


Summary:
1. in the outline of the editbox with type ahead you will find below the “ajax” component. Select it to see it’s properties in the appropriate pane.
2. select valueMarkup = true
3. add a function name (eg. getNames(searchValue) which returns an unordered list of elements and surround every part which should NOT be part of the value returned into the field with: <span class=”informal”>text you don’t want in the field after selecting the target value</span>
4. add searchValue in the var property

we use Managed Beans to return type aheads (which makes it WAY faster as the JavaScript does not need to be evaluated!)

bookmark_borderindip: making type-ahead easy as pie in 3 steps!!!

Did you ever use the Extension library names picker? Do you like it? I don’t!

Why? It requires the user to use his mouse and make too many clicks to get to what he wants.

I have a better way to achieve it and it can be adopted to any type-ahead you would like: in only 3 steps!!!

And the coolest thing is: you can actually “fine tune” it.

Just to give a clue:
We have a database regarding travels which requires the user to enter his flights, we have a huge list of airports worldwide. So the user has 3 options for type-ahead: 2 characters will search for all airports in the country with that ISO code, 3 characters will search for a specific airport by that identifier and if the user enters more characters a full text search is being conducted! Ain’t that cool?

Steps: (check out the color coding where each piece goes to)
1. Define the field, make sure the var attribute is the one used as parameter to the method call of your bean, make sure the Class name is the name you defined as bean name (see step 3)

<?xml version=”1.0″ encoding=”UTF-8″?>
<xp:view xmlns:xp=”http://www.ibm.com/xsp/core”>
<xp:inputText id=”airport”>
<xp:typeAhead mode=”partial” minChars=”2″ var=”searchValue
preventFiltering=”true”
valueList=”#{javascript:TypeAHeadBean.searchAirport(searchValue)}”
ignoreCase=”true”>
</xp:typeAhead>
</xp:inputText>
</xp:view>
2. Define the bean:
public class YourBean implements Serializable{

private static final long serialVersionUID = -4498155370434392583L; // this can be auto generated and is required for beans as they have to be serializable

public ArrayList<String> searchAirport(String searchValue){
try {
ArrayList<String> al = new ArrayList<String>();

Database db = (Database) DominoUtils.getCurrentDatabase();

                         // this is the part you may want to customize, ie with a creative view you might not need FTSearch (take a look at ($Users) in the names.nsf
View view = db.getView(“lupAirports”);
if( 2 == searchValue.length()){
view.FTSearch(“[AirportCountryCode]=”+searchValue, 0);
}else if(3 == searchValue.length()){
view.FTSearch(“[AirportCode]=”+searchValue, 0);
}else{
view.FTSearch(“*” + searchValue.toLowerCase() + “*”, 0);
}


Document doc = view.getFirstDocument();

while(null != doc ){
                                // the values you add here will be displayed in the type ahead
al.add(doc.getItemValueString(“AirportName”));

doc = view.getNextDocument(doc);
}
                        // maybe you wanna sort the result properly
Collections.sort(al);
return al;
} catch (Exception e) {
// TODO Auto-generated catch block
e.printStackTrace();
return null;
}
}

}

// maybe you wanna add some “recycling of Notes objects”…

3. Setup the bean:
Add the bean to the faces-config.xml
  <managed-bean>
    <managed-bean-name>TypeAHeadBean</managed-bean-name>
    <managed-bean-class>com.acme.YourBean</managed-bean-class>
    <managed-bean-scope>view</managed-bean-scope>
  </managed-bean>
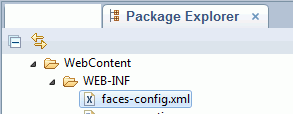
If you open the Package Explorer view you will find the faces-config.xml here:

Results:
more than 3 characters type-ahead conducting a fulltext search
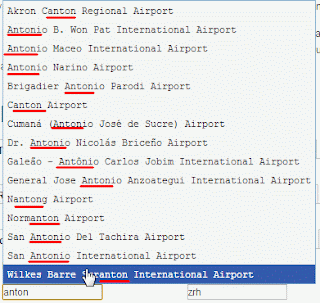
3 characters type-ahead which looks up the specific airport

2 characters type-ahead which looks for all airports in the country denoted by the 2 character ISO code
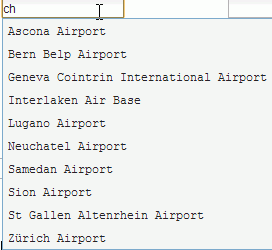
I hope one again you enjoyed my blog.. any comments are welcome, don’t hesitate starting a discussion about an interesting topic

bookmark_borderquindip: use ctrl F8 to switch perspectives

so you read my article about how easy it is to debug xPages and now get stuck in the debug perspective all the time but you would like to checkout your code etc?

simple: use <ctrl><F8> to switch perspectives.

If you open first all those perspectives you don’t need and close them via WindowClose Perspective then it’s a simple matter of <ctrl><F8> to switch between Debug and xPages perspective

ah.. as a side note:

did you know that you can actually “debug” the building of the xPage component tree itself?
Open the Package Explorer view and inside your LN application open the Localxsp folder. There you will find the Java classes which have been created out of the XML in the xPages designer!

You can then set a breakpoint in the Java class for your xPage here:

    protected AbstractCompiledPage createPage(int pageIndex) {
        return new nameOfYourXPage();
    }

bookmark_borderquindip: accessing grouped values (checkbox/radio groups)

I was trying to get the selected values from a check box group, but I failed miserably…

Almost when I gave up I got an error and then I found this site:
the XPages Extensibility API Documentation

via the class XspSelectManyCheckbox I then figured I had to search for the JSF API.

There I found this:
java.lang.Object[] getSelectedValues() 
Return the currently selected values, or null if there are no currently selected values.

which basically means:

getComponent(“myCheckBoxGroupID”).getSelectedValues() will return an ARRAY!!! checkout the [] at the end the object.

so finally it was easy to parse the selected values:
var valueArray = getComponent(“myCheckBoxGroupID”).getSelectedValues();
// valueArray[0] contains the first value
// valueArray[1] contains the second value etc.

can you believe it how stupid I am? and how relieved to finally have found a way to read the selected values with SSJS?

bookmark_borderquindip: how to make extension library tooltips work properly

It’s really simple:

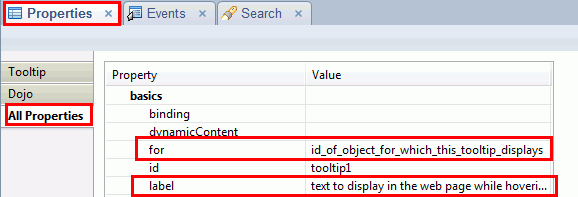
Drag’n drop a tooltip control from the extension library controls onto your page and set the appropriate properties:

XML source code:

<xe:tooltip id=”tooltip1″ for=”id_of_object_for_which_this_tooltip_displays” label=”text to display in the web page while hovering the target object”></xe:tooltip>

Result:

The only thing left is to add proper styling. As soon as I have themes working the way I require I will post more on this here