bookmark_borderget UNC path of fileserver file

If you work a lot with Sharepoint, and Windows, you’ll know: links to other files on mapped (S:) fileserver don’t work. You need the UNC path for this to work properly.

Getting UNC path on Windows is, sorry, a pain in the ass. Yes, there are “workarounds” there, like creating a link in an outlook email etc. Yes there’s VBScripts which use Internet Explorer to copy the path to your clipboard. But this doesn’t work in our environment due to some policies which prevent IE object being properly instantiated.

So I was looking for another solution and created this cute script:

# run without arguments will create a file called DropFileToGetUNCPath.lnk

# if you drop a file onto the shortcut it'll return the UNC path

if($args[0] -eq $null)

{

            # creating the shortcut to drop files later on

            $path = $pwd.path

            $script = $MyInvocation.MyCommand.Path

            $WshShell = New-Object -comObject WScript.Shell

            $Shortcut = $WshShell.CreateShortcut("$path\DropFileToGetUNCPath.lnk")

            $Shortcut.TargetPath = "C:\Windows\System32\WindowsPowerShell\v1.0\powershell.exe"

            $Shortcut.Arguments = "-noprofile -file """ + $script + """"

            $Shortcut.Save()

}else{

            $file = $args[0]

}


$drive = $pwd.drive.name + ":"

# find UNC paths for directories

$drives = net use

$drive = ($drives -match ".*" + $drive + ".*")

#debug

#echo $drive

$parts = $drive -split "\s{1,11}"

#debug

#echo $parts

$windowsDrive = $parts[1]

$uncDrive = $parts[2]

$file -replace $windowsDrive, $uncDrive | clip

What the code does: it copies the UNC path (if possible, otherwise the normal path if from a local file) to clipboard

Put it into a file called something.ps1. In the screenshot the file is called getUNCPath.ps1

Execute the file with PowerShell. It’ll create a shortcut, named DropFileToGetUNCPath.lnk with Target …powerShell.exe (such that I can drop a file onto it) with some other parameters, one of them being the name of the script you are currently running and which will do the conversion.

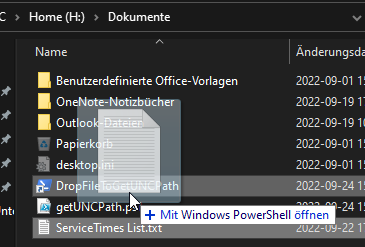
You can put this script in any location and run it via PowerShell… it’ll create the file DropFileToGetUNCPath.lnk in that location.

Once you drop a file onto the shortcut it’ll create the UNC path and puts it into clipboard, ready to be pasted whereever you need it

As a matter of fact, if you Windows>Execute then Shell:sendto, copy the file into the Location which opens, you can “Send” any document and you’ll have it’s path in the clipboard thereafter.

bookmark_borderAdd a ribbon with custom image to Excel

There’s a tool out there which helps creating ribbons with custom icons. Google is your friend.

I don’t like tools very much hence I figured it out myself as I like to understand how it works.

Here I explain it plain and simple

HowTo:

Rename your Excel file to filename.xlsm.zip

Double click the new ZIP file. DO NOT Extract, just open!

Create a “customUI” folder

In the customUI folder you add an images folder with your custom images

Then you need to adjust/create some files.

The .rels one in the _rels folder in the root. Here you add the “reference” to your customUI

Something like this

<relationship id="someID" type="http://schemas.microsoft.com/office/2006/relationships/ui/extensibility" target="customUI/customUI.xml">
</relationship>

For the second one you create a _rels folder within folder customUI and put a file with filename customUI.xml.rels with following contents in there:

<!--?xml version="1.0" encoding="UTF-8" standalone="yes"?-->
<relationships xmlns="http://schemas.openxmlformats.org/package/2006/relationships">
	<relationship id="deletePivot" type="http://schemas.openxmlformats.org/officeDocument/2006/relationships/image" target="images/deletePivot.png"></relationship>
	<relationship id="stackedBarClear" type="http://schemas.openxmlformats.org/officeDocument/2006/relationships/image" target="images/stackedBarClear.png"></relationship>
	<relationship id="stackedBar" type="http://schemas.openxmlformats.org/officeDocument/2006/relationships/image" target="images/stackedBar.png"></relationship>
</relationships>

The id attribute (in bold), of the image reference, you then need to reference (bold below) those images in the last file we need to create.

This file name customUI.xml within the customUI folder contains the following content

<customui xmlns="http://schemas.microsoft.com/office/2006/01/customui"> 
	<ribbon> 
		<tabs> 
			<tab id="CustomTab" label="Service Now Tools"> 
				<group id="Breaches" label="Breaches Report"> 
					<button id="createReport" label="Create Report" image="stackedBar" size="large" onaction="createReport"></button>
					<button id="resetReport" label="Reset Report" image="stackedBarClear" size="large" onaction="resetReport"></button>
					<button id="deleteReport" label="Delete Report" image="deletePivot" size="large" onaction="deletePivot"></button>
				</group>
			</tab>
		</tabs>
	</ribbon>
</customui>

I am not 100% sure about the naming conventions of customUI.xml and customUI.xml.rels. I think the .rels file has to begin with the same as the customUI.xml file.

Once all done, remove the .zip ending and open the file in Excel.

The result is this:

new tab
your newly defined ribbon buttons with custom images

The only thing now you need to do is to add “code” in the file (kind of macros), ie. subs with the same name as defined in the customUI.xml in the onAction attributes

Public Sub CreateReport(ByVal control As IRibbonControl)
Public Sub DeletePivot(ByVal control As IRibbonControl)
Public Sub resetReport(ByVal control As IRibbonControl)

What I then did:

I saved the Excel file as Addin (.xlam). This way I can distribute the file to whom I want, Updates should be kind of a breeze and the buttons are available in EVERY Excel file you load.