This blog is like a daily journal, I will continue to update this post about my findings during the journey. It is more about difficulties or challenges I had to deal with than about the actual code.
While most content is macOS (or Unix) related, I am very confident that the shown approaches will work in a rather similar way in other environments (Windows) as well.
The actual code/approach how to make the trading bot itself I have explained (with docu/code in the documentation of the video)
This project is mainly based on NodeJS, there are parts I am using in Python, cause I had the code already.
Most important Tip
De-complexify problems
Start with something you can handle and increase step by step the complexity of the task.
Run a script manually, before trying to schedule it, to see if the script runs at all. Run first a very simple script scheduled, before you run a complicated script, to see if you can successfully schedule a script.
Feed a tool first manual data, get a feeling for the data structures you need to supply (JSON, Arrays, …). Play around, meaning, feed wrong structures to see the outcome. Only once you know what the tool expects start to feed data automatically.
Check the chapter about bot simulations for another tip how to “de-complexify” problems.
Summary
So after a lot of trials and errors, fixing errors, bringing new ones in, due to being tired, I think I have finally found a version which makes me optimistic to make some profit. The simulations I run, with the triggers I chose, came 75% of the times with a profit, ranging up to more than 20% in 2 weeks.
My bot has higher profits in “normal” times, in high volatile times, like end of January where XRP soared heavily, it performed worse, but still in an acceptable area, where few humans would be able to do better without just being lucky. Once I see it performs bad, I simply send a signal to stop trading, yet I do not need to fiddle with scripts/cron etc.
I will leave my bot now running for a few weeks to check how it performs, no interruption anymore.
Feels good, having coded a lot, having learned a lot about macOS, Unix shell scripting, Python, Signals.
If you have any questions, feel free to contact me at @iPinky77 on Twitter.
according to Tim Tripcony (read the comment on this blog) quindip means confusion, I am now trying to unConfuse you about the confusion I created with my accronyms I use
INDIP: INDispensabletIP (those ones which I deem very important in any xPages developers knowledge bag)
QUINDIP: QUickINDIP (those ones I deem quickly explained, 2min to read, understand and implement)
FRULE: FRUstratedLearningExpierence (things I learned the hard way (shall I repeat how hard?), ie. it took me hours/days to get the hang of it and mostly in the end it was so obvious only I lacked some very basic knowledge in the first place)
CRYFH: CRYForHelp (when I have no clue anymore how to proceed and I need your input)
YOUFEB: YOUrFEedBack required (please gimme comments, ask questions what you want me to blog about etc)
DYHOP: DoYouHaveOtherProposals for accronyms? 😉
ups.. something very important I almost forgot…
let the game begin (provide your ideas in the comments): any idea what the anagram ofin-mood is?
well.. a hint: in-mood is the anagram of the actual word. When I had my own company few years ago, I was so in (good) mood about stuff I was doing that time.. that I figured: great this will be my company name!
Unfortunately I cannot offer anything as a price to the winner besides maybe some special mentioning in a blog entry or my personal effort trying to help to solve an interesting xPage problem!
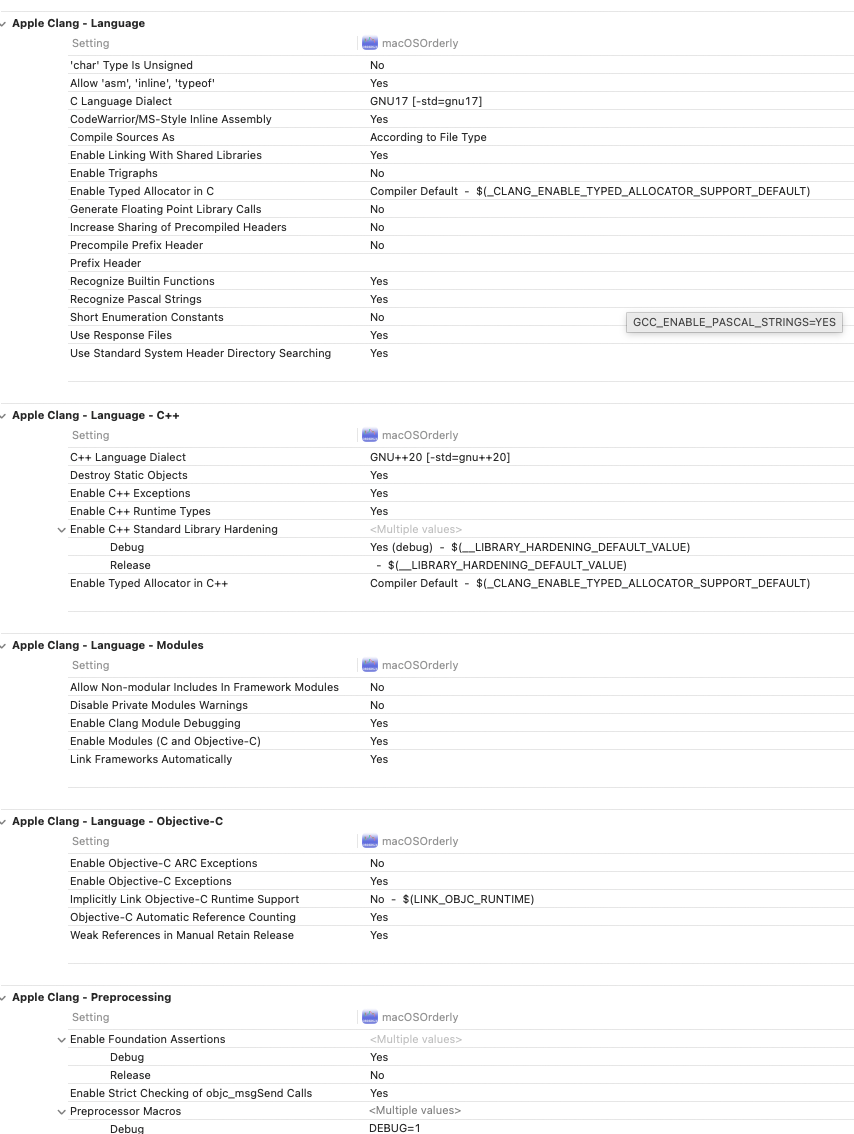
As you may imagine it takes quite some time to get to know an IDE like Xcode. Too many features, many things I still today have no clue why they are offered to “customise”, yet no-one can tell you how you can customise. Like all those compiler settings like only the most hard core programmers have any clue what they do.
Things to customize
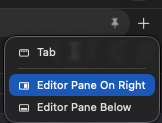
Xcode can be quite confusing regarding editors, editor panels, window tabs. Try out what fits best for you. I prefer most of the time to have a new editor open when clicking a source file. I also like it to be pinned.
Settings
But there are situations where you don’t want all files to open in a new pinned editor tab. Then change to manually or when document is being edited.
Sometimes, as in my case with iOS and macOS port, I needed to compare certain views for differences. I then, sometimes, opened either a new window tab for both iOS and macOS. Sometimes I just opened a new editor pane.
The confusing thing with separate window tabs is, that a new window tab is like a copy of the existing window tab. My suggestion: play around get a feeling of what works well, what doesn’t and adjust the Navigation settings accordingly.
Shortcuts
Shortcuts can make your life easier. For me, using a Swiss German keyboard, certain shortcuts are awkward to use. I have removed a lot of shortcuts.
My most use shortcuts:
<shift><⌘><f> to find globally
<⌥><⌘><j> to filter project navigator
<shift><⌘><0> to quickly open a file (zero not an o)
<ctrl><6> to quickly display (and filter) a file’s properties/methods/marks (TODO/FIXME/MARK)
<⌘><1-9> to quickly change navigator (will also hide the navigator if corresponding number is displayed already)
<⌘><b> to build (see if compiler complains)
<⌘><r> to run
<ctrl><0> to select scheme (used for build/run)
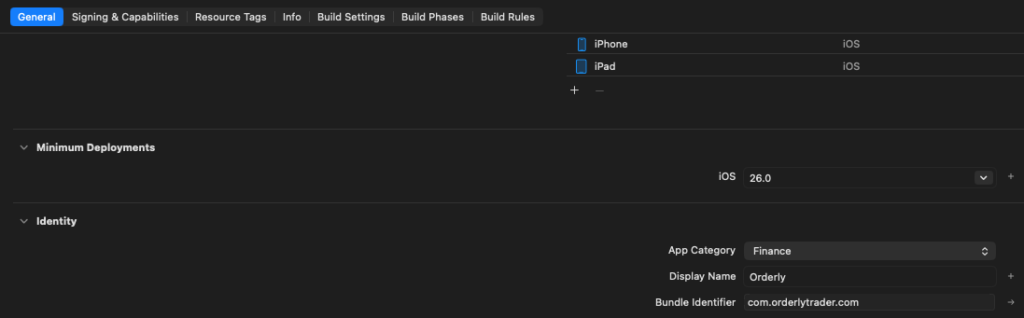
Bundle Identifier
The bundle identifier is very important. I believe changing it, will automatically create a new simulator. So if you rely on dbs where you have stored certain required settings, make sure you do not change Bundle Identifier abirtrarily.
Product Name
iOS: Display Name decides the app’s name
macOS: To change display name for macOS you need to change the Product Name
Capabilities
For iOS I wanted to use FaceID to “uncover” the API secret. For it to work I had to enable FaceID capability and write a sentence for what it is being used for
For Sandbox usage (TestFlight) I had to enable Network capabilities, interestingly only for macOS port
App Icon
I strongly recommend using Apples Icon Composer. It is slightly awkward to use, but with some playing around you can actually create quite nice app icons.
GIT Integration
I first thought: Git integration for a “one-man-show”? why? Eventually it proved very useful. I had 2 situations where I could recover changes which, not using GIT, would have been lost. So get yourself used to it early on.
My personal advice: commit one time too much instead of one time too less. I’d work on small improvement pieces and commit and push repeatedly. For bigger milestones it pays off to actually enter valid commit comments. Instead of working, use “functionality x working, but UX needs improvement”. Or when you deem a “version” is ready, eg. V0.5.4, then commit it as such.
My flow:
2 branches (main / dev)
develop on dev, compile run (git checkout dev and develop, then inside Xcode, stage, commit, push)
merge into main (in cml: git checkout main, git merge dev)
Main advantage of using multiple branches: You can test on one branch.. if all fails: delete the branch and create a new copy from the last commit where everything worked (chatGPT can help with appropriate GIT commands)
I only stage/commit/publish in Xcode. Rarely I switch branches. As UI does not immediately reflect the newly activated branch.
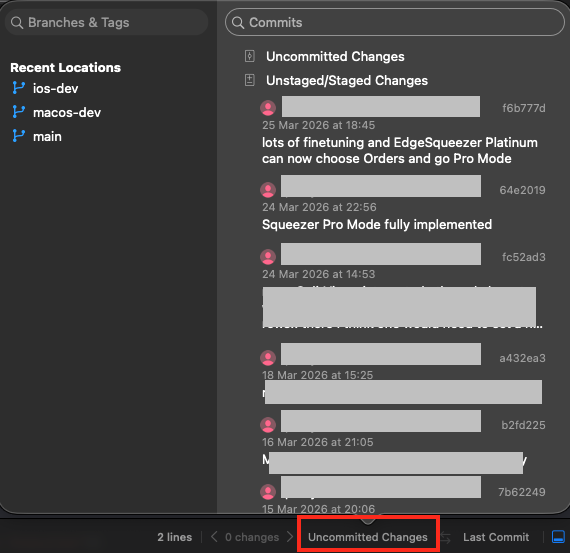
Differences
Not sure if you can use that feature without GIT. But to be able to see differences between now and any commit is great.
Enable differences in the top right of the editor with the left/right arrow button.
Once Differences view is displayed you can on the bottom go back to any commit.
ErrorHandling / Debugging / Logging
Errorhandling is usually for me, in a new development environment, one of the first things I want to get right. It can help you so much during debugging issues.
I have implemented very easy to use static methods:
Log.info
Log.warning
Log.error
Log.debug
Log.trace
The first 3 are written to log files which can be shared with me. Debug/Trace I mainly use while developing to really deeply inspect what’s going on.
Messages are displayed for both ports via a ZStack Overlay
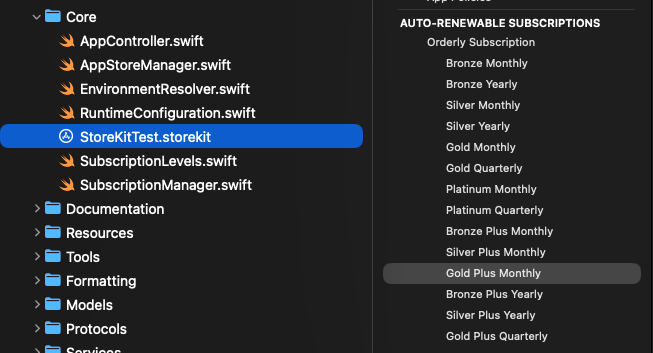
AppStore integration
I know, having to pay Apple a lot of money to be able to use its AppStore may be quite frustrating. But seeing the functionality it offers: it definitely is worth it.
As a matter of fact you can create a “local” AppStore implementation.
You may choose to give proper names in localisation
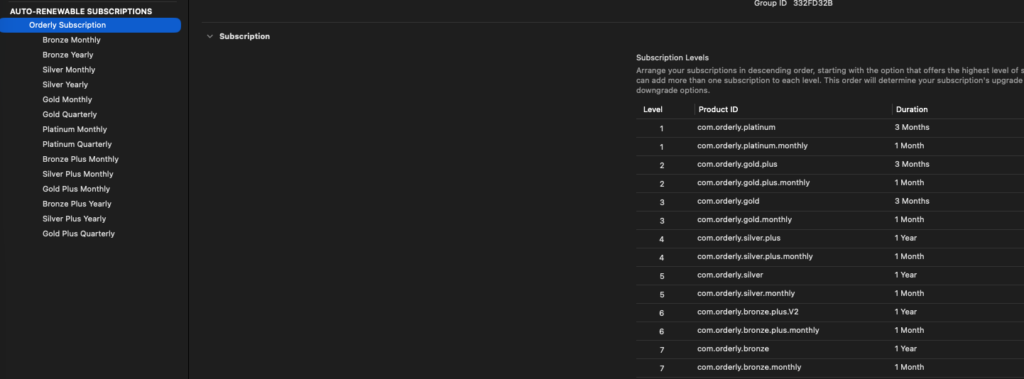
And, VERY IMPORTANT, you need to make sure about the right order. Highest subscription level is 1. In my case monthly and yearly/quarterly share the same level. If you fail to order properly, you will not be able to upgrade/downgrade properly.
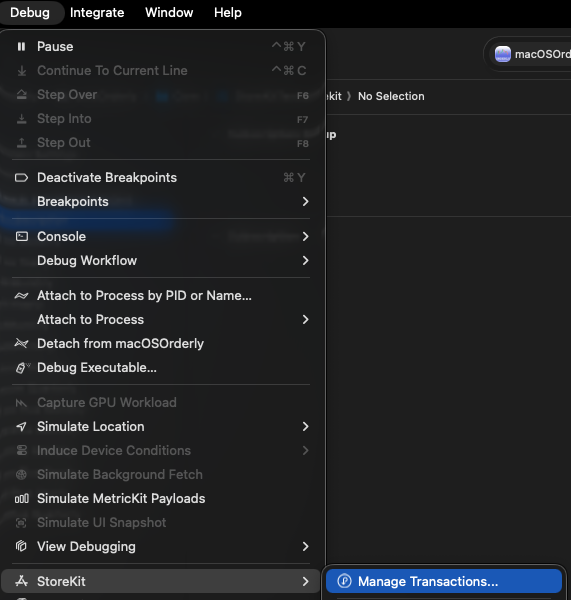
To test you can also delete current subscriptions
AI (Apple Un-Intelligence)
As mentioned elsewhere I basically started my whole app journey with AI. And it helped a lot. But without your mind properly set, you will not succeed. ChatGPT is as stupid as it gets. But read on.
The Xcode integrated chatGPT talks to much. Like pages of why / what blabla… It does not obey my “rules”, eg. yes/no questions are to be answered with yes/no.
Mostly, like literally ALWAYS, it does NOT have context. It like sky high level seems to remember what you are about to build. But when you start complicated stuff, several days of work, it may happen, you need to start explaining every day again afresh. And AI might propose everyday “new” patterns. I more than once ended up with multiple versions os similar but not enough half working solutions.
THIS IS A, SORRY, FUCKING PAIN!!!!!!!! And anyone telling you: AI will do your work in due time: he’s a big liar. Without your brain, AI itself won’t get anything to work. Sincerely: NO CHANCE. Where chatGPT IS great: helping with single standalone stuff: eg. I need a view to show xyz, it shall have a list of items from that store in status whatever..
Like literally I do not think I made any SwiftUI view myself. That was like 99% work of chatGPT. I merely adjusted stuff to like really look nice. Where I often faced another problem. Something in UX is off. Boundary to small, overlapping stuff, invisible stuff visible etc… You ask chatGPT for help, it answers like: this is why it will work now … then I already know: he (for me it’s a he), is just guessing.
Like literally in countless situations with issues in UX or backend logic chatGPT fails to help. Once I figured: Orderly stats are not properly updated during engine execution. For like 4 hours I was fighting with him. He like stubbornly wouldn’t move an inch to find the problem, insisting the problem was there! Even though I had uploaded the source files for investigation. I had to literally prove (with debug logs) EVERY FUCKING step, that the problem was NOT where he thought it would be. After about 4 hours debugging, there was just 1 possibility left. And indeed that one line was wrong. So in this respect chatGPT helped me a bit stubbornly to do some rubberducking in the end. But he completely failed to find the problem.
Same issue I had when I first uploaded, prepared AppStore connect, with all my subscriptions. Like in total I spent like a week trying to figure out how to get AppStore subscriptions to work. Okay, without chatGPT it might have been a full month of trial and error.
And something which REALLY (sorry again, FUCKING) annoyed me: He always was trying to impose old patterns (ObservableObject instead of @Observable). Every help on onChange he resolved with an approach which is legacy and soon not supported anymore.
In 2 cases: he helped develop a functionality which, in the end, required enabling “Capabilites” on the project. Early on I asked when it didn’t work: do I need to turn on a capability? No, not required.. after like hours of fucking trial and error I figured: Yes the capability IS required to be enabled.
Summary: as much as chatGPT helped, as much it was responsible for my frustrations. And the Xcode version: forget it. You cannot even ask it: why does this work there but not here. I was like 95% of the time using the web chatGPT, uploading relevant source files, or screenshots etc.
AND chatGPT mostly in edge situations was almost always wrong. Mostly because he was trained with old info, or because he couldn’t connect the dots really, thus not being really intelligent at all.
What AI can really do well is create single standalone stuff (a view). As soon as you need to start connecting stuff, he’s miserable AND NOT FUCKING INTELLIGENT AT ALL….
Enough ranting: Yes AI helped me a lot, but was also responsible for like 99.9% of my huge anger and frustration. And calling it “intelligent” is not correct. AI is NOT intelligent. It can create new stuff with your rules. But it cannot connect it to the rest of the system. And this is why AI will never, at least for a long time not, replace real programmers.
The hierarchy of views, especially for macOS is quite complex and deep, mainly due to almost automated creation of routes via a lot of enums and ForEach.
StateModels
I mentioned it in the last paragraph here already: do not go down the road of using @State variables and binding to other views excessively. It’ll bring you to refactoring hell.
Example: I use a right side bar, for help and module configurations. I wanted to bind <esc> key to release the content of the right side bar. Shortcut is bound in a high level view, as well as the closures telling what to do.
    .onAppear{
        workspaceModel.releaseSideBarAction = {
            snapshotsModel.setComparing(false)
            moveFundsModel.reset()
            historyModel.isFiltering = false

        }
    }
    .onExitCommand {
        workspaceModel.releaseSideBar()
    }

@Observable
final class WorkspaceStateModel {

    var releaseSideBarAction: (() -> Void)?


    func requestSideBarAccess(_ newContent: RightSideBarContent) -> Bool {
	// make sure right side bar displays currently requested content
    }

    func releaseSideBar() {
        content = .none
        showSideBar = false
        // closures from the various state models to ensure proper release of right side bar
        releaseSideBarAction?()
    }
}
If you use StateModels for all those values you need to make available between different views, then you might face the problem, that some places require a real binding. E.g. List selection: $selected
You can however bind the $selected value in an onChange modifier
Section{
    List(orders, id: \.id, selection: $selected) { order in

	// your list content
    }

} header:{
	// your section header content
}
.onChange(of: selected){ _, newValue in
    // update your StateModel with the $selected value

}
So the most obvious thing to start with are “views” in Swift. I had seriously no clue where to begin with. But I had AI to ask for help, and help it did.
So I gave my ideas: I need this and that, separated by …, then a table with x and y.
So my first app being iOS, as you may imagine, available space is not abundant. So you have to think good of what and how you want to display.
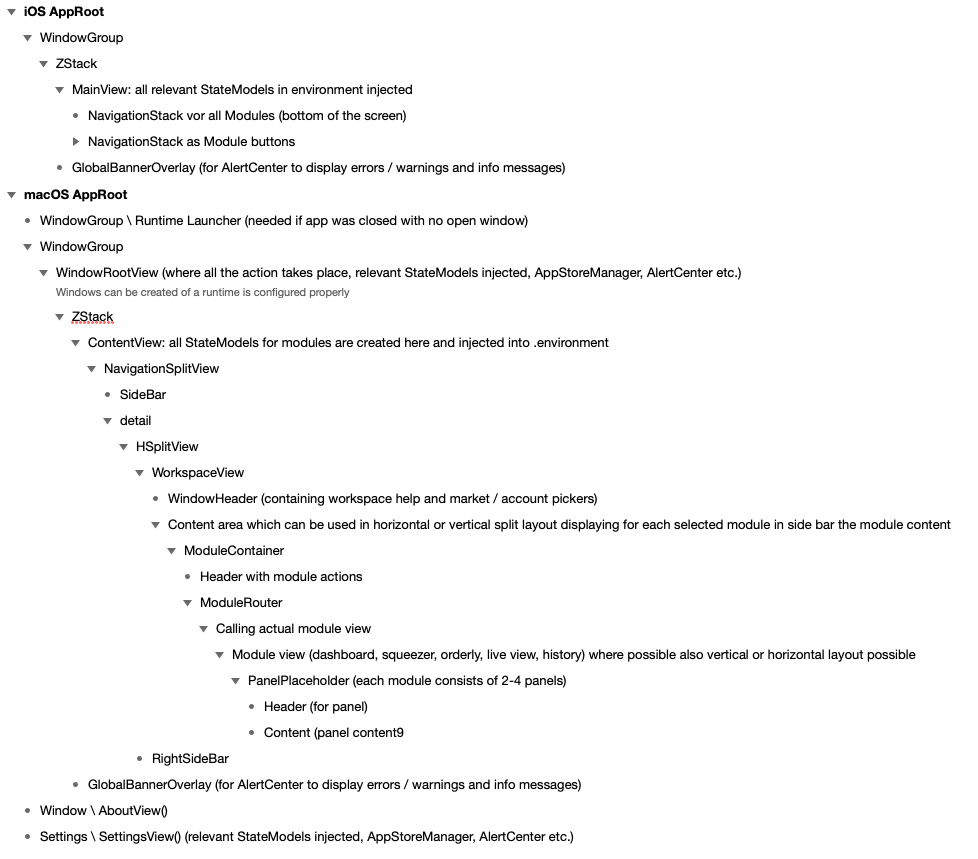
In both ports, iOS & macOS, you have basically and “AppRoot”, where the app starts.
In iOS this is rather easy, as basically you present the first view of your app and then build the routes to the various parts of your app.
macOS port however is a bit more complicated. In my case I have:
Settings
2 WindowGroup (which spawns runtimes for the various exchanges and if no runtime available gives an intermediate screen neccessary as macOS needs to be able to open 1 window)
About
This more complex setup makes it necessary that you attach required StateModels into Environment into each of the windows (Settings, WindowGroup..). This makes wiring everything properly together slightly more complicated as in iOS. Then within a Container of WindowGroup you’ll start arranging your window. Mine is a NavigationSplitView and the detail is again a HSplitView, such that I have a right side bar to display configuration views or help.
Configuration Panels
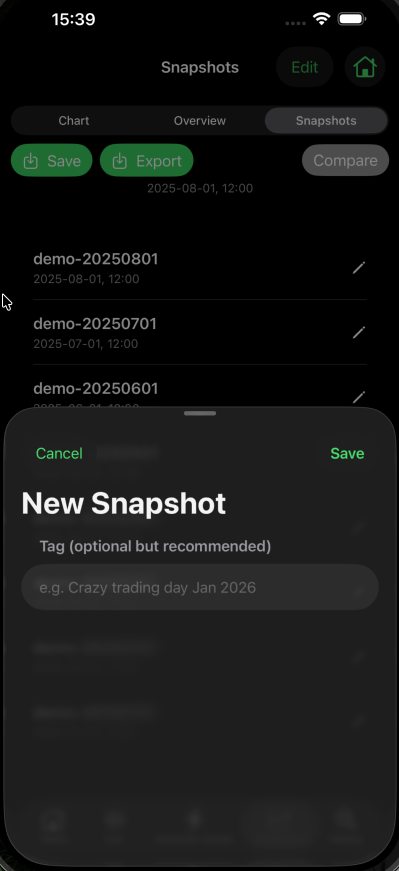
iOS Sheets
In iOS you may work with sheets, to present configuration panels or help.
you may control sheet size with
.presentationDetents([.medium, .large])
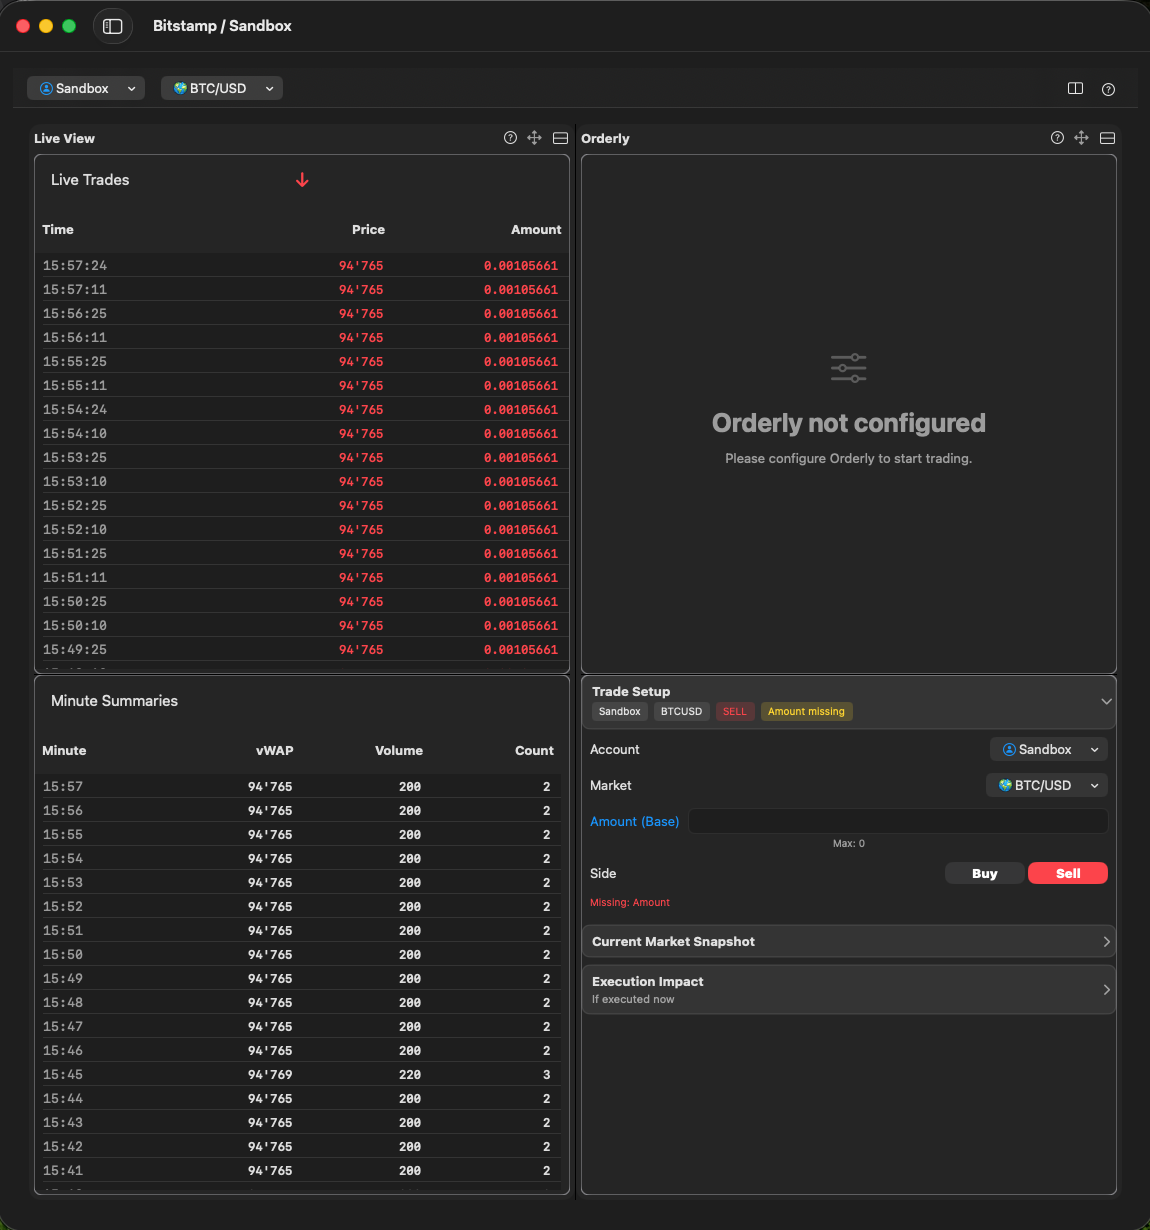
macOS HSplitView / VSplitView
On macOS you may decide to use HSplitview to show like resizable “panels” in order to display Configuration views, or Help
Unfortunately I didn’t know about these H-VSplitView until very deep into the project. A point where I had lost already hours, almost days, figuring out how I could make the workspace more configurable.
Eventually I ended up with a version which lets the user split horizontally or vertically, both on workspace and on module level.
Navigation
iOS .segmented Pickers (Tabs)
On iOS you may use .segmented Pickers to create something like tabs.
macOS Navigation
On macOS you do not really need a navigation in that sense. With the Sidebar from NavigationSplitView I have paths to all my modules, and a little bit more (ie. Help and Refresh runtime). As Settings view is also a child of AppRoot I could just easily inject the StateModels I needed.
Settings
In iOS I made an own kind of “section” for settings. In macOS Settings are handled differently. They have their own window, are called always from the same place.
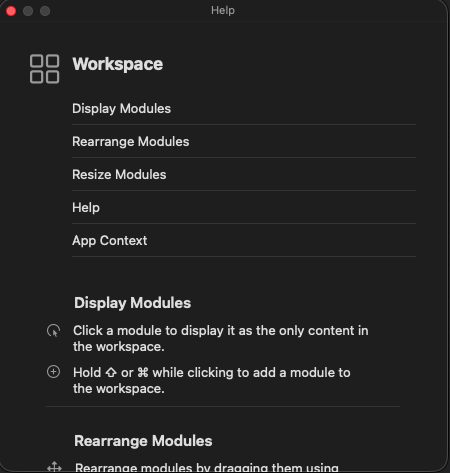
Help
On iOS I used 2 ways for help:
with an “i” button inside views, but just for quick help
Alerts are handled identical on both systems. Basically by applying a ZStack GlobalBannerOverlay to the Root View. If you need it in Settings and other Windows too, apply the ZStack there too!
On iOS I had, for simplicity to add some “Pickers” to every view needing them: Market & Account Picker. On macOS however I could handle this globally. Pickers are available on the workspace view
Buttons / Toolbars
What on iOS is handled with .toolbar functionality,
I have implemented with “Modul actions” displayed on module view level.
Gestures (iOS only)
For EdgeSqueezer I have invented an own gesture, long tap then swipe, to make sure you do not accidentally squeeze by just tapping a button or so. So the user really needs to intentionally activate a squeeze.
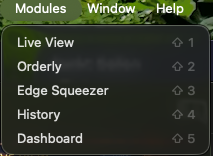
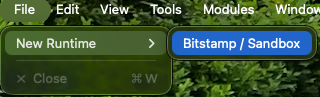
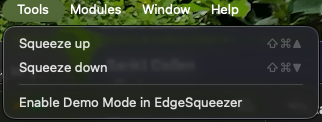
Menus / Shortcuts (macOS only)
On macOS you have menus, short cuts hover and possibly many other features I didn’t even explore.
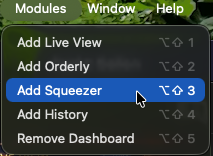
I have built my own menus and short cuts. And don’t believe chatGPT if he tells you: You cannot simply use a “modifier” to “modify” a menu. Yes, you can
Button("Live View") {
    // normal button function
}
.keyboardShortcut("1", modifiers: [.shift])
.modifierKeyAlternate(.option) {
    let isEnabled = isModuleEnabledAlready()
    Button(isEnabled ? "Remove Live View" : "Add Live View") {
	// modifier button function
    }
}
Attention
In order for menus & keyboard shortcuts to work, the window needs be focused. You may need to add a .focusable() modifier somewhere in the root view.
Instead of passing a bindingValue I propose to bind StateModels
@FocusedBinding(\.workspaceModel) var workspaceModel
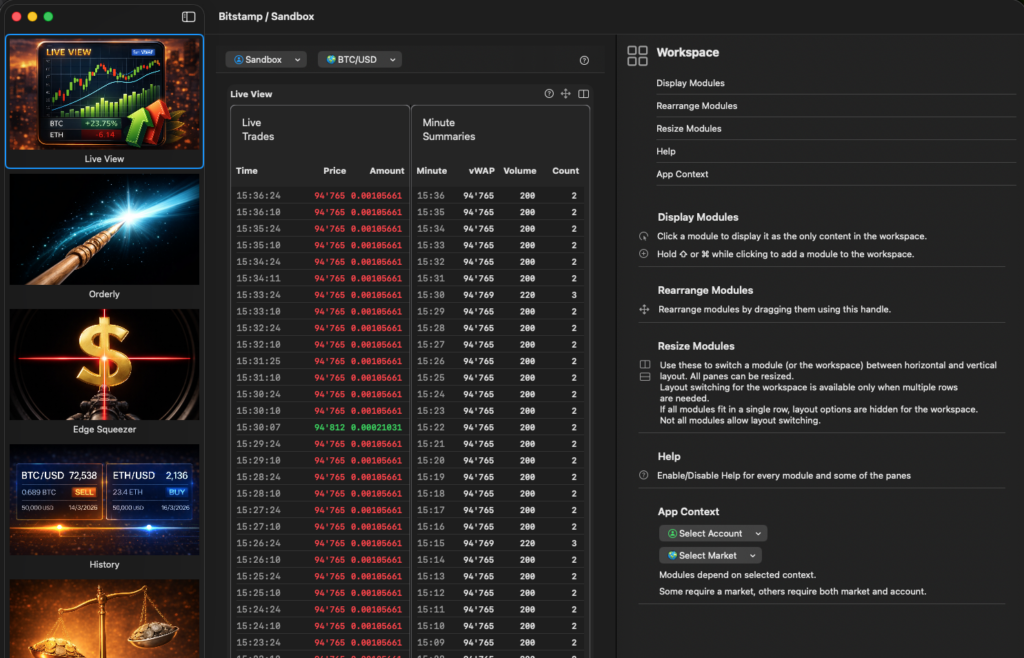
Tips & Tricks
GeometryReader
On macOS a user may resize his windows, stretch, squeeze etc. You may want to adjust some stuff in your layout and/or images. In Orderly a module has a width of 600px. As long as the window width can place all active modules in 1 row, you cannot change layout between vertical and horizontal. The split will always be vertical. As soon as you squeeze the window and not all modules fit in 1 row, you can change layout.
Also side bar images. Some might get unreadable when too small, just us another image which has less small details for smaller sizes.
StateModels vs. @State variables
As soon as you have more than 1 @State variable you need to bind to other views: don’t do it. Use StateModels you can inject and consume via @Environment. If you do use @State variables and Bind them to other views you’ll soon be in refactoring hell, cause you need in every call to make sure that you actually have those variables.
I ended up defining most StateModels at AppRoot so I could inject them into Menus, Side bars and Settings eventually.
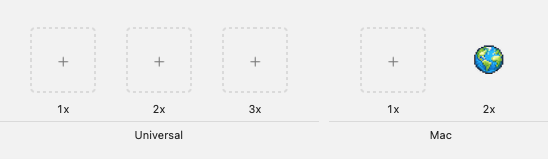
Image in Menu
For reasons I don’t know, for macOS, I had to put the “globe” icon for the market picker in a macOS 2x asset. Only that way I could resize the icon. Every other way always resulted in a too big icon.
Menu {
    if activeMarkets.isEmpty {
	Text("No active markets")
    } else {
    // create the buttons
    }
} label: {
    HStack(spacing: 10) {
	Image("Globe")
	    .resizable()
	    .scaledToFit()
	Text(currentLabel)
	    .foregroundStyle(.primary)
    }
}
Follow me on my journey to a full-fledged Apple ecosystem trading system.
Bullrun end of 2017
So end of 2017, by accident a few weeks before the bullrun began I made my first investment into cryptocurrencies. After doing a lot of research on the technology and what each of the then existing cryptos had to offer.
So I really got lucky that, I guess it was less than 2 weeks later, prices of all then popular cryptos started to rise. So I got hooked. And I also got spoiled, I was misled be HODL. Basically HODL means: do not sell, wait for life changing rewards.
How wrong this theory was!
Lost my job
A few years later, I had increased my crypto positions a lot by then, I lost my job and got stuck in that situation for over 2 years. But I needed something to work on, a task. So I spent some time starting to really trade my assets. And interestingly enough: I could increase the amount of assets in a more or less decent way. I figured: most of those popular cryptos suffer every now and then huge drops. While most people fear losing their investments I eventually realised: cool, now I can increase my position!
Quick detour
While most believe drops in price are a threat to their investment, I, unfortunately rather later than sooner, realised: indeed each of these situations can actually help increase your position. Let me quickly explain(don’t nail me on the “wrong” numbers, %, I use these “rounded” numbers to illustrate the truth):
Say you buy an asset at 10$, then it drops 15%. You should now get out, even more when you see it will drop more. Say you spent 1000$ on the asset when it was 10$, it dropped to 8.5$, you sell. you only get 850$ back. So yes, you realised a loss of 15%. If however price keeps dropping, say another 15% to 7$, you can then buy with the 850$ more of the asset than you had before. In fact if you buy at 7$ for 850$ you get 120 of the asset. That’s a whooping 20% more than you initially had. And that even though you temporarily had incurred a loss of 15%. Okay, admittedly, in terms of “real value” you are still at a loss. But let’s assume price rises again to 8.5. In that case you real value is already 1020. So you have already more than you initially had when you bought for a 1000$ at 10$. Let’s now assume price rises again to 10$, in that case you can see: You indeed made 20% profit. Had you not sold and bought at lower price, you right now only had like 0 profit. Had you followed the sell/buy approach you now have 20% more value.
Interesting thing about my trading experiences was: I was super nervous on my first trade, don’t remember, maybe 100$. Over time I increased my order sizes, lost my nervousness. My largest order was about a quarter of a million $, obviously my assets had in the meantime reached a good price.
Bot
And through all that trading experience I thought: how can I optimise? I don’t mean entry/exit, well at least not based on signals. Most analysts say: buy then sell then, but I never saw anyone who was like 100% right, not even 50% right. I just stuck with the idea of “huge fast drop” many times presents an opportunity window to increase the position. So the idea of my bot was born.
The bot I programmed in Python. It was more or less successful, but not at the rate I imagined. So every now and then I resorted to manual trading, or semi-automatic trading: let my bot sell, and myself tried to find a good entry (or exit depending on perspective) myself.
And it was in these situations where I found: damn: when price drops like in almost % per minute… you have a hard time to adjust your orders to squeeze just that little bit more edge out of your trades.
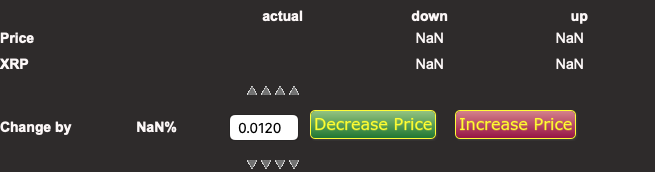
So the idea of EdgeSqueezer was born.
A very crude but working HTML/Javascript prototype which allowed me to adjust an order in repeated steps by the same “difference”. At that time yet, I would not know it would eventually be known for “EdgeSqueezer“.
Lost my Job again
As it happens I lost my job again. Was paid for about 4 months, but could leave instantly.
Again I was looking for something I could work with, a task.
That was the birthday of the idea of creating an iOS app which would offer this “EdgeSqueezer” functionality to more aficionados. But where to start? It happens that, around this time, AI was integrated into Xcode, the IDE for Apple ecosystem development projects. So I gave it a try and it helped me a lot to get to know the language, the structures, helped me with architectures, UX, basically everything where I still lacked knowledge. And while I was developing the iOS part, enhanced with other, minor, functionality, it dawned on me: I could also create a cool macOS port of it. The base code was identical. Only UX needed some tweaking.
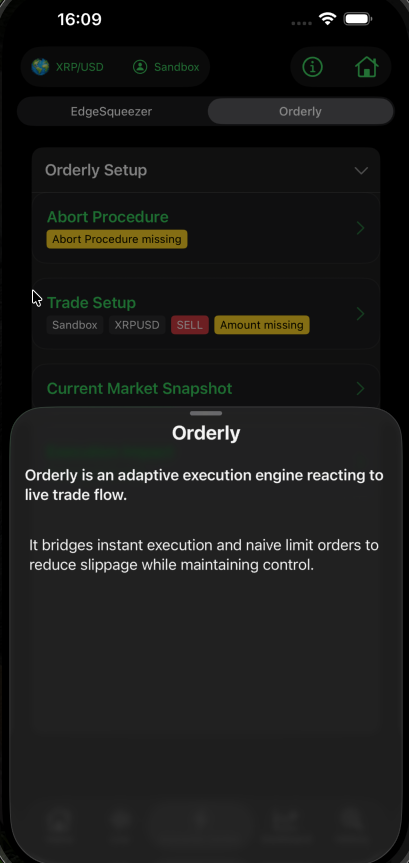
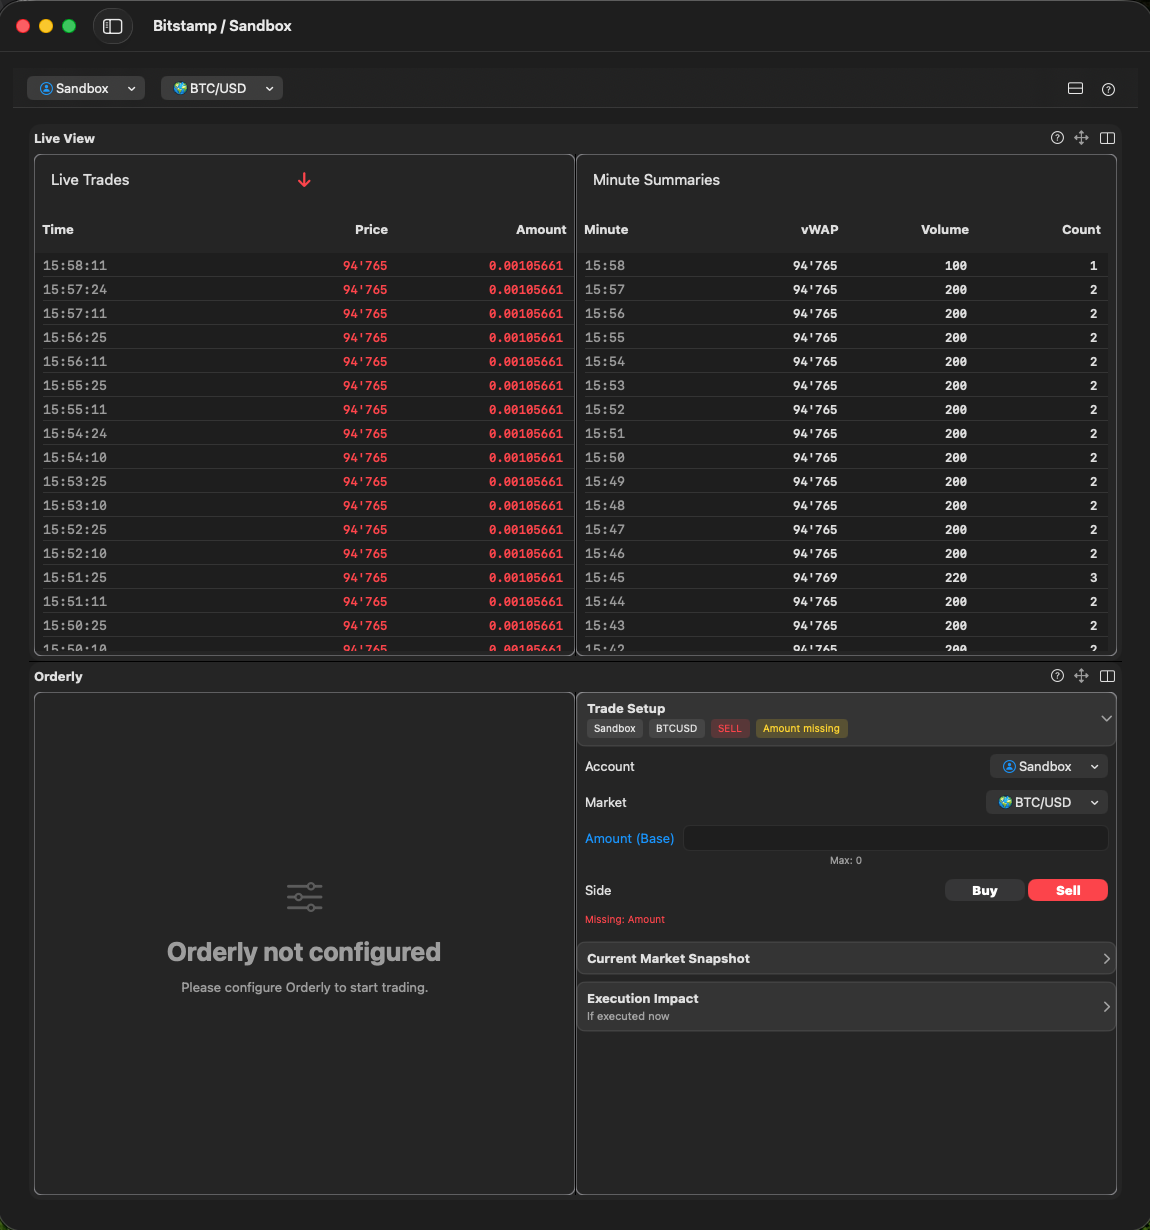
And here I am, having finished V1.0 of both ports, awaiting successful Apple Review for fellow traders to equally profit from EdgeSqueezer and Orderly, an idea which was born along the journey. Orderly, as a matter of fact was first introduced in my trading bot. The bot up to then, would upon signal to sell, sell at market, thus walking the order book, crossing the spread. Introducing the Orderly mechanics the bot does not sell at market anymore, but as limit, best offer on your side. And reality shows: it works even for those quarter of a million $ trades it, that mechanism, worked quite effectively, not once needing to resort to “fall back” to a market order anyway.
At work we have some situations, where we would like to have in some tools links pointing to certain records or a specific record within ServiceNow.
In the old platform (links like service-now.com/now/nav/ui/classic/params/target/incident_list.do) you could, at least for lists, achieve that. Perform the query (using a filter) to suit your needs and then “copy query” and adjust it to your liking in the other tool.
In the next experience workspace architecure, this isn’t quite as simple as in the old platform.
So how could I achieve this?
Initially I tried the “query” parameters route. E.g. something like sysparm_query=…
That did not work for the “/list” page. These URLs, I could not figure out differently, always use a “tiny-id” and a “list-id”. Both I cannot figure out outside ServiceNow.
I then thought: maybe “/simplelist” will do! And indeed, using /simplelist you can provide query parameters, although you have to figure out the details yourself.
It took me some trial an error to figure out how this works. Easiest way: Create the query in the old platform and replace everything after query/… with the “copied query”
But if you want to open a specific record? You’ll need, as to my current knowledge, the sys_id. In another system you have no chance knowing the ServiceNow sys_id of a record. But maybe you know a “number”, eg. an account number, a case number or something like it.
Then you can use this approach:
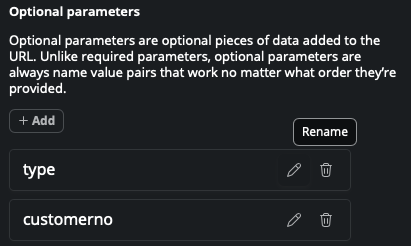
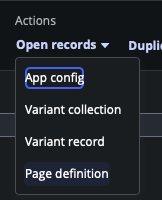
in UI Builder create a redirect page with optional parameters. These parameters could be: table and value
In my case it was type and customerno
Now I could open any type of record(s) which can be identified by the customer number.
Add (a) client state(s) where you parse the required values from the URL you require in the datasource. If you use table field value as optional parameters, then you create for each of them an own client state.
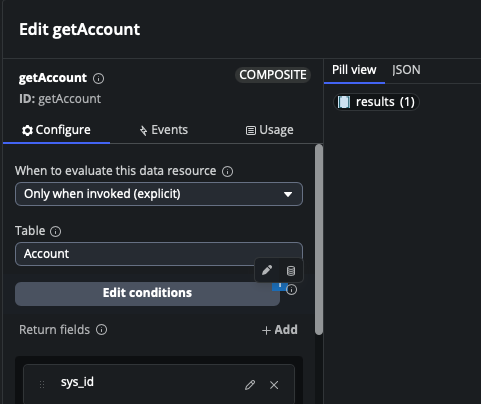
In the page add an appropriate data source (lookup multiple records!!!!). In my example it was: getAccount, table Account, only when invoked (explicit).
ONLY in Look up multiple records data source you can define “conditions”. In Look up single record you have to provide sys_id.
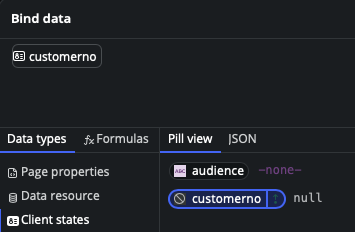
In the conditions I would filter account by customerno
where the customerno was to be found in a client state field, click the db icon to be able to bind data
and bind it to the client state
You could bind the table client state to the table property of the data source. You cannot bind the field name of the condition to a client state, unfortunately. So you have to kind of hard code that in the dataSource.
The client state(s) is/are set in a Client script
function handler({api, event, helpers, imports}) {
    api.setState('customerno', api.context.props.customerno);
}
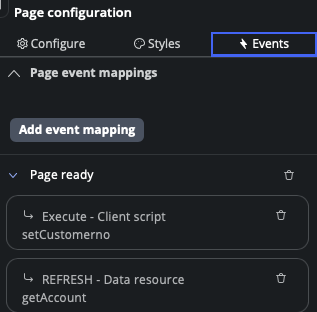
The client script is called in the page ready of the body of the page
Also I call a “refresh” data source, as the client state (customerno) now is known, the required data can be fetched.
Here I am not 100% sure. I assume the events are executed sequentially. You can change the order if you go to Settings and then select Page definition
In the Internal Event Mapping you can change the order of the events
As you see I changed the order of the two events: getAccount and client script
At this point you’ll have “traced” the optional parameters in the URL with the client script and refreshed your data source to find the record(s) you need.
now create another client script (redirect) where you direct (navigate) to the page in workspace you require
{

    if ('services' == api.context.props.type) {
        var customerno = api.context.props.customerno;
        helpers.navigate.to('simplelist', {'table':'cmdb_ci_service'},{'query': 'company.ref_customer_account.u_customer_number=' + customerno});

    } else if ('account' == api.context.props.type) {
        helpers.navigate.to('record', {'table':'customer_account','sysId': api.data.getAccount.results[0].sys_id.value}, {'selectedTabIndex' : 1});
    }
It took me a while to find the proper syntax to find the sys_id from the results in the data source. Also how I could select the “contacts” tab (first tab in account) to me a little while to figure out.
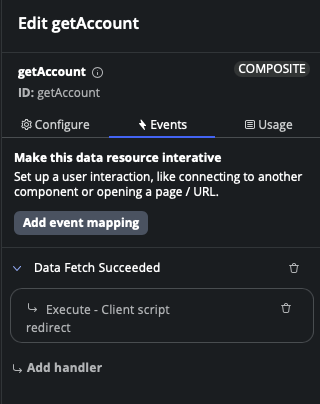
But when do you call the “redirect” client script?
In the Events in the data source. there’s an event “Data Fetch succeeded”
And for debugging purposes I’d recommend having a “logEvent” client script.
This logEvent client script you can call in any place you require more info about the result of an event. Then you can always use the Browser Debugger in the console and search for “yourPrefix->” to find interesting information. This Tip is kudos to Jesse (Debugging in UI Builder in ServiceNow) his Website
Now you can call from your other tool the URL like service-now.com/now/cwf/agent/redirect/params/type/account/customerno/20001753
This approach you could even use to create, pre-populated, records (incidents / cases)
Problem is: it will use the current “view” and thus, most likely, allow to change all fields.
What if you want to restrict this update to certain fields only?
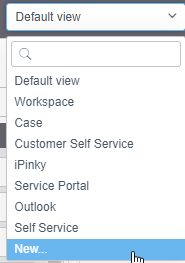
First design a new “view” only containing the fields they are allowed to change on mass. It’s actually a Form Design.
Configure Form Design\New…
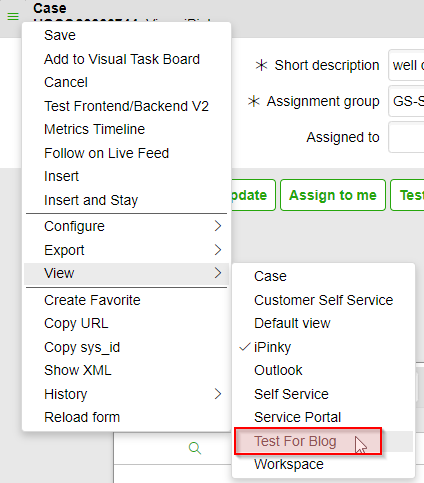
After creation you can switch to the newly created view (or form)
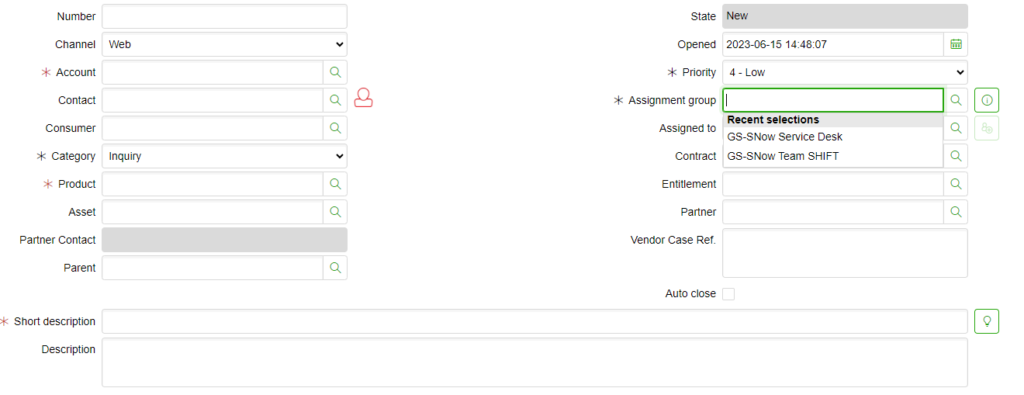
Before: Standard (or default form)
After: my stripped down form
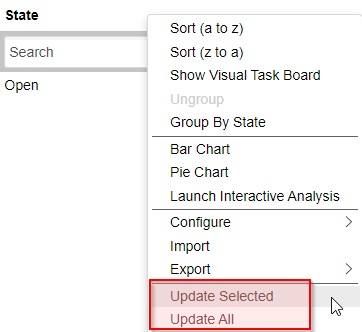
Basic idea:
An Client side UI action where we call the dialog, call the new “submit” button, handle updates on selected records.
Code: doStuff() is set in the Onclick field of the UI action
function doStuff() {
    try {
        var d = new GlideModalForm('my dialog`s title', 'your_table_name');
        //var d = new GlideDialogForm('my dialog`s title', 'your_table_name');

	d.addParm('sysparm_view','Test_For_Blog');

	d.addParm("sysparm_view_forced", true);
	d.addParm('sysparm_form_only','true');


        // in the fixSubmit we replace the submit button with our own "submit" button
        d.setOnloadCallback(fixSubmit);
	// used for GlideDialogForm
	//d.setLoadCallback(fixSubmit);

        d.render();

    } catch (e) {
        // log your error
    }

}

// this function will be called from the newly created button
// use this function to update your selected records as you please
function mySubmit() {
    try {
        // document from dialog in iframe
        var doc = document.getElementById('dialog_frame').contentWindow.document;
        // retrieve values entered in the dialog
        var sd = doc.getElementById('sn_customerservice_case.short_description').value;

        // g_list.getChecked has a comma separated list of sys_id of records you have selected
        var recordsToUpdate = g_list.getChecked().split(',');
        recordsToUpdate.forEach(function(thisElement) {
            var gr = new GlideRecord('sn_customerservice_case');
            // retrieve record
            gr.get(thisElement);
            // update it's values, maybe add a check if there WAS a value in the dialog, otherwise you'll write '' back to the records
            gr.setValue('short_description', sd);
            gr.update();

        });
        // remove the dialog from the DOM, to prevent a nasty message telling you you might lose entered data
        document.getElementById('dialog_frame').remove();
        // refresh the list
        g_list.refresh();
        return true;

    } catch (e) {
        // log your error
    }
}

// removing the original submit button as it creates a record which we don't need
// add our own submit button which calls the mySubmit function which updates records as needed
function fixSubmit() {
    try {
        // document from dialog in iframe
        var doc = document.getElementById('dialog_frame').contentWindow.document

        // hide original submit button as it always creates a new record which we don't need
        var btnSubmit = doc.getElementById('sysverb_insert_bottom');
        btnSubmit.style.display = 'none';

        // create our own submit button
        var btn = doc.createElement("button");
        btn.innerHTML = "our own Submit button";
        btn.type = "button";
        btn.name = "formBtn";
        btn.id = "mySubmitButton";
        // the mySubmit will not be on the iframe of the dialog but on the entire page
        // that's why we need to call it via parent.
        btn.setAttribute('onClick', 'parent.mySubmit()');
        // insert the newly created button where the original has been hidden above
        btnSubmit.parentNode.insertBefore(btn, btnSubmit.nextSibling);

    } catch (e) {
         // log your error
    }

}
The crucial thing to make d.addParm(‘sysparm_view’,’Test_For_Blog’); work was the next line:
If you work a lot with Sharepoint, and Windows, you’ll know: links to other files on mapped (S:) fileserver don’t work. You need the UNC path for this to work properly.
Getting UNC path on Windows is, sorry, a pain in the ass. Yes, there are “workarounds” there, like creating a link in an outlook email etc. Yes there’s VBScripts which use Internet Explorer to copy the path to your clipboard. But this doesn’t work in our environment due to some policies which prevent IE object being properly instantiated.
So I was looking for another solution and created this cute script:
# run without arguments will create a file called DropFileToGetUNCPath.lnk

# if you drop a file onto the shortcut it'll return the UNC path

if($args[0] -eq $null)

{

            # creating the shortcut to drop files later on

            $path = $pwd.path

            $script = $MyInvocation.MyCommand.Path

            $WshShell = New-Object -comObject WScript.Shell

            $Shortcut = $WshShell.CreateShortcut("$path\DropFileToGetUNCPath.lnk")

            $Shortcut.TargetPath = "C:\Windows\System32\WindowsPowerShell\v1.0\powershell.exe"

            $Shortcut.Arguments = "-noprofile -file """ + $script + """"

            $Shortcut.Save()

}else{

            $file = $args[0]

}


$drive = $pwd.drive.name + ":"

# find UNC paths for directories

$drives = net use

$drive = ($drives -match ".*" + $drive + ".*")

#debug

#echo $drive

$parts = $drive -split "\s{1,11}"

#debug

#echo $parts

$windowsDrive = $parts[1]

$uncDrive = $parts[2]

$file -replace $windowsDrive, $uncDrive | clip
What the code does: it copies the UNC path (if possible, otherwise the normal path if from a local file) to clipboard
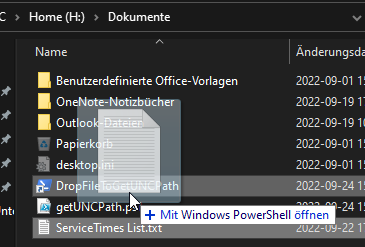
Put it into a file called something.ps1. In the screenshot the file is called getUNCPath.ps1
Execute the file with PowerShell. It’ll create a shortcut, named DropFileToGetUNCPath.lnk with Target …powerShell.exe (such that I can drop a file onto it) with some other parameters, one of them being the name of the script you are currently running and which will do the conversion.
You can put this script in any location and run it via PowerShell… it’ll create the file DropFileToGetUNCPath.lnk in that location.
Once you drop a file onto the shortcut it’ll create the UNC path and puts it into clipboard, ready to be pasted whereever you need it
As a matter of fact, if you Windows>Execute then Shell:sendto, copy the file into the Location which opens, you can “Send” any document and you’ll have it’s path in the clipboard thereafter.
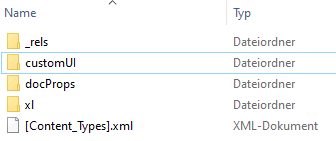
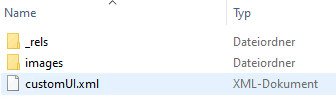
I am not 100% sure about the naming conventions of customUI.xml and customUI.xml.rels. I think the .rels file has to begin with the same as the customUI.xml file.
Once all done, remove the .zip ending and open the file in Excel.
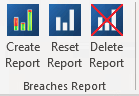
The result is this:
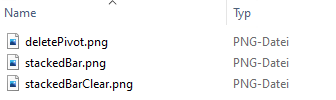
new tab your newly defined ribbon buttons with custom images
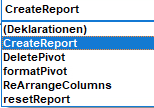
The only thing now you need to do is to add “code” in the file (kind of macros), ie. subs with the same name as defined in the customUI.xml in the onAction attributes
Public Sub CreateReport(ByVal control As IRibbonControl)
Public Sub DeletePivot(ByVal control As IRibbonControl)
Public Sub resetReport(ByVal control As IRibbonControl)
What I then did:
I saved the Excel file as Addin (.xlam). This way I can distribute the file to whom I want, Updates should be kind of a breeze and the buttons are available in EVERY Excel file you load.
batchUpdate() works on values if you use sheet.values().batchUpdate() and works on sheet properties if you use sheet..batchUpdate()
So I wanted to be notified for my tradingBot (made in Python), if a certain KPI was met. On my Mac, no problem. I use Notify.
from notifypy import Notify
But I wanted to receive a notification even when I am not sitting at my computer. I figured with the help of Google I could achieve this. So I write to a Google Sheet some values and there I trigger an AppScript which sends me an email if KPI is met.
First attempt:
    values = [[datetime, last, change, gain, loss, rsi]]
    part1 = {
        'values': values
    }

    result = sheet.values().update(
        spreadsheetId=SAMPLE_SPREADSHEET_ID, range="Sheet1!A2:F2",
        valueInputOption="RAW", body=part1).execute()


    values = [["insert into ticker (datetime, last, change,gain,loss) values ( '{}',{:f} ,{:f} ,{:f}, {:f} )".format(
        datetime, last, change, gain, loss, rsi)]]
    part2 = {
        "values": values
    }
    result = sheet.values().update(
        spreadsheetId=SAMPLE_SPREADSHEET_ID, range="Sheet1!A5",
        valueInputOption="RAW", body=part2).execute()
execute() was called twice, for each row I update. Hence triggering the AppScript (which sends an email) twice. I always wondered why I receive duplicates. Couldn’t figure it out.
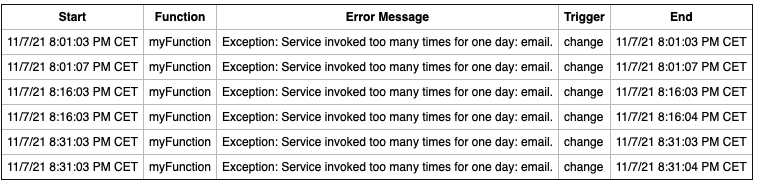
Then I received a warning from Google: too many emails sent, with some sort of Log
Google AppScript Log
So I saw: aha, it actually calls the “myFunction” twice. I immediately knew it had to do with how I update the sheet.
I quickly figured there’s a “batchUpdate” function. But documentation was awfully bad. Sheets does know 2 different kind of requests. One kind updates the sheet’s properties (colours/rows, design stuff). The other updates it’s values. BUT they don’t tell that very explicitly. By luck I figured it works like this:
    values = [datetime, last, change, gain, loss, rsi]
    part1 = {
        "range": "Sheet1!A2:F2",

        "values": [
            values
        ]
    }

    values = [["insert into ticker (datetime, last, change,gain,loss) values ( '{}',{:f} ,{:f} ,{:f}, {:f} )".format(
        datetime, last, change, gain, loss, rsi)]]
    part2 = {
        "range": "Sheet1!A5",
        "values": values
    }

    requests = {
        "valueInputOption": "RAW",
        "data": [

            part1, part2

        ]
    }

    sheet.values().batchUpdate(spreadsheetId=SAMPLE_SPREADSHEET_ID,
                               body=requests).execute()
and the important part is the “.values()” part in the last line. I first tried without it and Google told me: don’t know range, don’t know data, don’t find fields and other stuff.
As soon as I added the .values() it worked seamless