bookmark_borderGoogle Sheets API – batchUpdate

batchUpdate() works on values if you use sheet.values().batchUpdate() and works on sheet properties if you use sheet..batchUpdate()

So I wanted to be notified for my tradingBot (made in Python), if a certain KPI was met. On my Mac, no problem. I use Notify.

from notifypy import Notify

But I wanted to receive a notification even when I am not sitting at my computer. I figured with the help of Google I could achieve this. So I write to a Google Sheet some values and there I trigger an AppScript which sends me an email if KPI is met.

First attempt:

    values = [[datetime, last, change, gain, loss, rsi]]
    part1 = {
        'values': values
    }

    result = sheet.values().update(
        spreadsheetId=SAMPLE_SPREADSHEET_ID, range="Sheet1!A2:F2",
        valueInputOption="RAW", body=part1).execute()


    values = [["insert into ticker (datetime, last, change,gain,loss) values ( '{}',{:f} ,{:f} ,{:f}, {:f} )".format(
        datetime, last, change, gain, loss, rsi)]]
    part2 = {
        "values": values
    }
    result = sheet.values().update(
        spreadsheetId=SAMPLE_SPREADSHEET_ID, range="Sheet1!A5",
        valueInputOption="RAW", body=part2).execute()

execute() was called twice, for each row I update. Hence triggering the AppScript (which sends an email) twice. I always wondered why I receive duplicates. Couldn’t figure it out.

Then I received a warning from Google: too many emails sent, with some sort of Log

Google AppScript Log

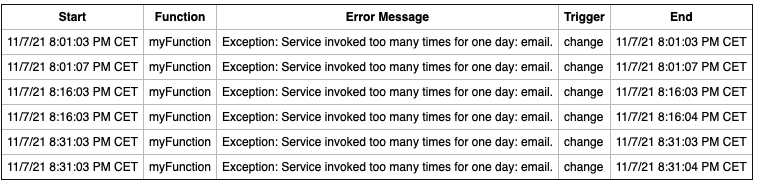
So I saw: aha, it actually calls the “myFunction” twice. I immediately knew it had to do with how I update the sheet.

I quickly figured there’s a “batchUpdate” function. But documentation was awfully bad. Sheets does know 2 different kind of requests. One kind updates the sheet’s properties (colours/rows, design stuff). The other updates it’s values. BUT they don’t tell that very explicitly. By luck I figured it works like this:

    values = [datetime, last, change, gain, loss, rsi]
    part1 = {
        "range": "Sheet1!A2:F2",

        "values": [
            values
        ]
    }

    values = [["insert into ticker (datetime, last, change,gain,loss) values ( '{}',{:f} ,{:f} ,{:f}, {:f} )".format(
        datetime, last, change, gain, loss, rsi)]]
    part2 = {
        "range": "Sheet1!A5",
        "values": values
    }

    requests = {
        "valueInputOption": "RAW",
        "data": [

            part1, part2

        ]
    }

    sheet.values().batchUpdate(spreadsheetId=SAMPLE_SPREADSHEET_ID,
                               body=requests).execute()

and the important part is the “.values()” part in the last line. I first tried without it and Google told me: don’t know range, don’t know data, don’t find fields and other stuff.

As soon as I added the .values() it worked seamless

Looking forward to your comments

bookmark_borderOther stuff

Improving blogger experience

Almost forgot to mention how I improved blogger experience.
I needed a TOC (Table of contents), such that a reader can quickly jump to the section he's interested in.
Blogger does NOT offer this out of the gate.
 
So I dug, dug deeper and I found 2 solutions which actually create a TOC. But neither was good enough. 
 
One only fetched only level of <H> tags, the other one fetched all but got lost as soon as there's more complicated HTML code between the <H> tags.
 
So I used some parts of both and improved upon it: You paste this in the HTML BEFORE everything:
 
<div id="myToc">
</div>
<hr />
<div id="myContents">
 
 
And you paste this AFTER everything
 
<script src="https://ajax.googleapis.com/ajax/libs/jquery/3.5.1/jquery.min.js"></script>
<script type="text/javascript">
countChapters = $("#myContents > h1, #myContents > h2").length
chapters = $("#myContents > h1, #myContents > h2")
flagLevel = false
var toc = ''
for (i = 0; i < countChapters; i++) {
chapter = chapters[i]
chapterTitle = chapters[i].textContent;


chapters[i].setAttribute("id", "chapter" + i);
if ('H2' == chapter.tagName) {
if (flagLevel) {
toc += "<li><a href='#chapter" + i + "'>" + chapterTitle + "</a></li>";
} else {
toc += "<ul><li><a href='#chapter" + i + "'>" + chapterTitle + "</a></li>";
}
flagLevel = true
} else {
if (flagLevel) {
toc += "</ul>"
flagLevel = false
}
toc += "<li><a href='#chapter" + i + "'>" + chapterTitle + "</a></li>";
}
}
 
document.getElementById("myToc").innerHTML = toc;
</script>
 
Then it will parse all H1/H2 tags and create a TOC at the top.
By fine-tuning the flagLevel thing you could even have it parse H3 tags.
 
Who's interested: let me know and I enhance the code for you!
 
This technique can actually be used on every HTML page


Install web server

This is an easy one on macOS, thanks to this
I had home-brew (brew) already installed. So I just needed to follow a few steps.
Apple delivers a built-in apache version, yet the default configuration is a bit not so straight forward. With the approach from above I had the web server running in a few minutes, pointing to my directories.
 

Make (bot) results accessible from afar

Here I needed to think/play a little bit. Years ago there were DynDNS services, for free. Nowadays they charge for their service. What they basically do is provide a hostname which is mapped to your dynamic public IP from your home router.
 
So I tried to build my own "rough" DynDNS solution.
 
I started with https://www.whatismyip.com and https://github.com/cheeriojs/cheerio a tool which lets you parse HTML on the server (and not on the client side). Here's a nice tutorial https://dev.to/diass_le/tutorial-web-scraping-with-nodejs-and-cheerio-2jbh.
 
On the way I learned that jQuery is a thing of the past and one should use React or Vue now, so I did a 30 minutes primer into Vue. Nice, but couldn't understand why/where it's better than jQuery. With Vue you have to "wrap" your tags into "v-" tags in order for it to work. Works well for applications, but it's a pain if you want to do very small things, like things I did with my visual tool to analyse charts.
 
Anyway: I got cheerio to read the contents of whatismyip.com and it took me almost 2 hours to figure, that they would not return my IP, as they realise the request is not from a user, but from a machine.
 
But there's other tools, like this one: http://ip-api.com/json Very straight forward. Returns my IP and that's all I need.
Now what to do with my IP? Store it on google drive? Do they have an API? After a few minutes tinkering I figured: I will use iCloud. Create a document there with a link to my "own" web server. And that's what I did.
Please don't judge me on this code: it's a prototype and does what it needs to do:
 
module.paths.unshift('/Users/michael/NodeJS');
const axios = require("axios").default;


url = 'http://ip-api.com/json'


const fetchHtml = async url => {
try {
const { data } = await axios.get(url);
return data;
} catch {
console.error(
`ERROR: An error occurred while trying to fetch the URL: ${url}`
);
}
};


async function doIt() {


var result = await fetchHtml('http://ip-api.com/json')
var path = '/Users/michael/Library/Mobile Documents/com~apple~CloudDocs/HTML/'
var ip = result.query
var fs = require('fs');
fs.writeFileSync(path + 'myServer.html', `</br></br></br></br></br><H1><a href="http://${ip}/heartBeats">myServer</a></H1>`)
fs.writeFileSync(path + 'myTool.html', `</br></br></br></br></br><H1><a href="http://${ip}:3000">myTool</a></H1>`)
}


doIt()
 
Important here is the first line. This is required as cron, which will run the script, does not know where my node modules are installed
 
If fetches the IP address from my router (via this URL), stores it in a link in a HTML file in a folder in iCloud where I can access it from anywhere in the world.
 
I only needed to to some port forwarding in my router. Port 80/3000 need to forward to my machine.
 
Interestingly, once I set it up, he, the router software, told me: my Mac will from now on have a static address. How nice!
 
Final piece: I created a a soft link in my web documents folder to the folder where I store my bot heart beats. So now I can call my server like:
 
http://my.ip.address/heartBeats
 
and it will show me the directory listing of my heartBeats so I can check from everywhere if my bots are running.


bookmark_borderStop Loss Trading explained


With my trading bot project in NodeJS I want to prove one thing:
One can profit even in bearish markets

Stop Loss Trading explained

What most people involved in trading, be it crypto or stock trading, don’t know: You can even in bear markets improve your position.
If you know, or are quite certain, your asset will one day have a high price you would want to have as much of that asset as you can, right?
Here’s the basic logic:
Does the price drop? Sell after you’re about 5-10% in the red. In worst case you made 5% minus. In best case the price of the asset drops further, which means you can buy in again with the money you still have.
Let me illustrate this.
Your asset is at 1 ($/€) and you have 100 ($/€).
You buy the asset, you now have 100 of it, but 0 ($/€) balance.
Price drops to 90 cents. Now you sell, you make a loss, you only receive 90 ($/€) back.
If the price drops furtherto 80 cents, it makes a lot of sense to rebuy in. At 80 cents with 90 ($/€) you now get 112.5 assets.
If the price goes up to 1 ($/€) where you initially bought, you made 12.5% profit!

Even if the price only goes back to 90 cents you’ll still make a small profit.

And even if the price drops 50% from 1 ($/€) to 50 cents. It still would pay off to sell now, wait for a further drop.
If you can buy in again at 40 cents, and the asset will only rise to 60% thereafter, you minimised a potential (had you not sold/rebought) 40% loss to only 25% loss.
Does the asset go up to 1$ however again, then you made AT YOUR initial price already 25% profit! As a matter of fact, would you not sell at 50 cents and just wait for a 25% profit, the asset would need to go to 1.25 ($/€). At that level IF you had sold at 50 cents and rebought at 40 cents, you’d have a whopping 50% profit already!

bookmark_borderQUINDIP: intercept wrong/inexistent documentId

Hi

long time no post… but alas.. finally something I really like:

Have you ever had the situation, that you have a xPage which is workflow enabled, and you have (maybe) multiple servers? Some users might even use the LN client front-end on another server. The workflow sends out a mail telling the approver to approve.

Boom… the document did not yet replicate to the target server…

you do not want either of this message displayed:

what to do?

hmm.. I first tried with this, sorry, was not happy with it…

thing is: we use the same xpView for production and for archive, only the data source changes in the background. This will open the documents from the archive with such an URL:
http://server/db.nsf/%24%24OpenDominoDocument.xsp?databaseName=server!!otherDb.nsf&documentId=6496BA354B37544CC1257C680059C04B&action=openDocument

I could not get this to work..

So I had to figure out another way to intercept a “wrong” documentId.

Solution: use a phaselistener!!! (how to implement see here, kudos to Sven)

Now I only need to intercept the first phase in the JSF lifecycle, test if the supplied documentId exists and redirect:

event.getFacesContext().getExternalContext().redirect(“xpDocumentNotFound.xsp”);
event.getFacesContext().responseComplete();

I do some checks and then call redirect and responseComplete which executes immediately and does not continue with the other JSF phases

and the best thing: this is UNIVERSAL!!! I don’t need to implement it for all xPages I use!

bookmark_borderQUINDIP: need to run an agent as signer from an xPage?

we needed a possibility for users to “override” the workflow, ie. interfere even though they were not “authors” at the moment. The only way was to do with an agent running with more access rights.

solution was: us “sessionAsSigner”

this would not work:
var agent = currentDatabase.getAgent(“(agnXPageWFMoveToState60)”);
agent.runWithDocumentContext(currentDocument.getDocument() );
return “xsp-reopen”;

this did work (kudos to Sven Hasselbach):
var agent = sessionAsSigner.getCurrentDatabase().getAgent(“(agnXPageWFMoveToState60)”);
agent.runWithDocumentContext(currentDocument.getDocument() );
return “xsp-reopen”;

hope this helps some people to achieve similar things

bookmark_borderINDIP: add visual indicator to type ahead

that’s how it looks:

field with type ahead waiting for input:
field with type ahead thinking
field with type ahead failure

this is the XML code of the field for the events:
<xp:eventHandler event=”onkeypress” submit=”false” id=”eventHandler2″>
<xp:this.script><![CDATA[if (event.keyCode==9 || event.keyCode==13){
removeVisual(‘view:_id1:inputText3’)
}else{
addVisual(‘view:_id1:inputText3’);
}]]></xp:this.script>
</xp:eventHandler>

<xp:eventHandler event=”onblur” submit=”false” id=”eventHandler3″>
<xp:this.script><![CDATA[removeVisual(‘view:_id1:inputText3’)]]></xp:this.script>
</xp:eventHandler>

and this is the style assigned to the field:
<xp:this.styleClass>
<![CDATA[#{javascript:if( currentDocument.isEditable()){ return ‘useTypeAhead’; }}]]>
</xp:this.styleClass>

this is needed in the CSS:
.useTypeAhead{
background: #fff url(“TypeAhead.gif”) no-repeat right;
}
.dijitValidationContainer{
width: 20px;
}
.dijitValidationContainer .dijitValidationIcon{
width: 20px;

this is needed in a CSJS library (cudos to Mark Roden and Sven Hasselbach)
function x$(idTag, param, jd){ //Updated 28 Feb 2012
// hardcoded
idTag=idTag.replace(/:/gi, “\:”)+(param ? param : “”);
return( jd==”d” ? “#”+idTag : $(“#”+idTag));
}

var inputField;

//addVisual function used to add a loading image to the screen and make it visible
//expected input string similar to view1_:id1_:viewPanel1
function addVisual(idTag){
var newImage=”url(‘loading.gif’)” //Change me for your server
inputField=dojo.query(x$(“widget_”+idTag, ” .dijitValidationIcon”, “d”))
inputField.style(“backgroundImage”, newImage);
inputField.style(“visibility”, “visible”);
inputField.style(“backgroundRepeat”, “no-repeat”);
inputField.style(“backgroundPosition”, “right”);
dojo.query(x$(“widget_”+idTag, ” .dijitValidationContainer”, “d”)).style(“display”, “block”)
inputField.attr(“value”,””)

}


//— hijack dojo XHR calls
//Thanks to Sven Hasselbach for this ajax intercept code
//
var typeAheadLoad;

dojo.addOnLoad( function(){

 /*** hijacking xhr request ***/
 if( !dojo._xhr )
    dojo._xhr = dojo.xhr;

 dojo.xhr = function(){
    try{
       var args = arguments[1];
       if( args[‘content’] ){
          var content = args[‘content’];
             if( content[‘$$ajaxmode’] ){
                if( content[‘$$ajaxmode’] == “typeahead” ){
               
                   /*** hook in load function ***/
                   typeAheadLoad = args[“load”];

                   /*** overwrite error function ***/
                //   args[“error”] = function(){
                 //     alert(‘Error raised!’)
                //   };
                   
                   /*** hijack load function ***/
                   args[“load”] = function(arguments){
                      /*** On Start ***/
                     // alert(“On Start!”);
                   
                      /*** call original function ***/
                      typeAheadLoad(arguments);
                   
                      /*** On Complete ***/
                  if (arguments.toLowerCase()==”<ul></ul>”){
                  var newImage=”url(‘typeAheadFailure.gif’)” //Change me for your server   
                  inputField.style(“backgroundImage”, newImage)   
                  }else{
                  inputField.style(“background”, “white”)
                  }
                   };
               }
           }
       }
    }catch(e){}
    dojo._xhr( arguments[0], arguments[1], arguments[2] );
 }
});


//removeVisual function used to remove the loading image from the screen and make it hidden
//expected input string similar to view1_:id1_:viewPanel1
function removeVisual(idTag){
var inputField=dojo.query(x$(“widget_”+idTag, ” .dijitValidationIcon”, “d”))
inputField.style(“backgroundImage”, “”)
inputField.style(“visibility”, “hidden”)
dojo.query(x$(“widget_”+idTag, ” .dijitValidationContainer”, “d”)).style(“display”, “none”)
}

//Checks to see if the visual icon is still running – if so then assume fail and kill it
function checkTimer(idTag){

dojo.query(x$(“widget_”+idTag, ” .dijitValidationContainer”, “d”)).style(“display”, “none”)

}

bookmark_borderINDIP: how to figure out the id of an element which triggered an event!

here’s the scenario:

We have what we call dynamic tables. It lets the user add as many rows as he requires. Really neat.
In some of the fields we use type ahead.

Recently I figured: it would be nice to see an indicator if the server is “thinking”… something like
I could do it easily via one specific field from which I knew it’s id …

But in those dynamic tables I have no clue on which field the event for type ahead was triggered….

until now:
Cudos to Paul Calhoun with his incredibly useful tips about CSJS (something I usually avoid as much as I can)

There I found the solution! You can call SERVER side JS from CLIENT side JS… isn’t that fantastic?

here’s how:
call the SSJS like this:
“#{javascript:<ServerSide JavaScript>}”

example to alert the id of an element via it’s event, in this case onFocus, which was triggered:
alert( “#{javascript:BackingBean.getElementId(this)}” )


For those ones interested what the getElementId does in my Java Bean:
UIInput input = (UIInput) handler.getParent();
return input.getClientId(FacesContext.getCurrentInstance());

Of course the UIInput could be changed to something more generic like UIComponent

stay tuned for my next blog which tells how I achieved proper visual indication

bookmark_borderINDIP: beware of the document.copytoDatabase method!

We had to merge two applications, so I created a background agent which copied all required documents to the “new” database. The customer tested and we set a due date for the real migration.
The night before actual migration I run an agent which deleted all “test” migration documents before the real agent to copy the documents run again!

Next morning I came to the office and thought: oh my dear. something went wrong! Only a few dozen documents had been copied, I thought!

So I rerun the agent again. First all seemed to be fine. Then a few hours later documents started disappearing. With no obvious reasons.

It took me about 3 hours to figure out that the method document.copyToDatabase would create the same UniversalId again!

So after having deleted the first round of “test” documents and recopied again at due date, the universalids of the documents had been in the deletion list of the LN db already. That’s why they started disappearing again after a while!

So I had to delete everything again to make sure, rerun the copy agent again but this time change the universalid.

Took me roughly a day to fix everything, something which normally would have taken about one hour.

bookmark_borderYOUFEB: anyone else being mad about the copy&paste (via keyboard / not working in designer?

I am getting over and over mad that copy & paste is not working well at all in the LN designer especially when dealing with xPages stuff..

I add a template inheritance to a design element, select it, copy via <ctrl><c> and paste it onto another design element, either I get something pasted i copied long time ago, or nothing at all.

so I have to revert to right click copy and right click paste..

this annoys me a lot.. is it just me or anyone else facing the same issue?

bookmark_borderINDIP: xPages isEditable() won’t work on panels with READ ACL! see my workaround

If you have workflow applications then it’s most likely that you wanna make certain parts of your xPage READonly for certain states (eg. such that an approver cannot change the details of the request he has to approve)

In old days we used access controlled sections. xPages gives us the possibility to add ACLs to panels, that servers (almost) the same purpose.

Why only almost? Cause all elements you put there to set data (buttons, links etc.) won’t be hidden even if you use currentDocument.isEditable().

Here’s my workaround:

on the Visible property of such a button etc.
instead of just:
currentDocument.isEditable()

use:
currentDocument.isEditable() && !YourClass.hasParentReadACL(getClientId(this.getId()))

now create a YourClass (we use our StandardUtil as it contains “standard” methods) and add this method:

public static boolean hasParentReadACL(String id) {
String[] components = id.split(“:”);
UIComponent parent = null;
String parentId = null;
int i = 2;
// the || is important as repeat controls within custom controls use the same id, so we have to
// get their parent as unique parent
while (null == parent || parent instanceof XspDataIterator) {
parentId = components[components.length – i++];
parent = JSFConnector.findComponent(parentId);
}

UIViewRoot root = FacesContext.getCurrentInstance().getViewRoot();
boolean hasACL = false;

while (root != parent) {
if (parent instanceof UIPanelEx) {
if (null != ((UIPanelEx) parent).getAcl()) {
hasACL = true;
break;
}
}
parent = parent.getParent();
}

return hasACL;
}

and voila all your additional buttons etc. are hidden if one of the parent panels has an ACL!
Of course you might change the code to really check for a READ ACL. We only use ACLs for READ so this check is at the moment superfluous.

ah.. a not so minor thing: we define the StandardUtil in a SSJS library to easy reference StandardUtil, in your case you may wanna use:
&& com.yourcompany.YourClass.hasParentReadACL()