At work we have some situations, where we would like to have in some tools links pointing to certain records or a specific record within ServiceNow.
In the old platform (links like service-now.com/now/nav/ui/classic/params/target/incident_list.do) you could, at least for lists, achieve that. Perform the query (using a filter) to suit your needs and then “copy query” and adjust it to your liking in the other tool.

In the next experience workspace architecure, this isn’t quite as simple as in the old platform.
So how could I achieve this?
Initially I tried the “query” parameters route. E.g. something like sysparm_query=…
That did not work for the “/list” page. These URLs, I could not figure out differently, always use a “tiny-id” and a “list-id”. Both I cannot figure out outside ServiceNow.
Example: service-now.com/now/cwf/agent/list/params/list-id/ef9ac3b5877f121089e543f30cbb35b1/tiny-id/sIYKkcDs6HlrzFnjpxowg0iDZnaXLxgV
I then thought: maybe “/simplelist” will do! And indeed, using /simplelist you can provide query parameters, although you have to figure out the details yourself.
Example: service-now.com/now/cwf/agent/simplelist/sn_customerservice_case/params/query/stateIN10%2C18%5Eassigned_toDYNAMIC90d1921e5f510100a9ad2572f2b477fe%5Estate%3D10
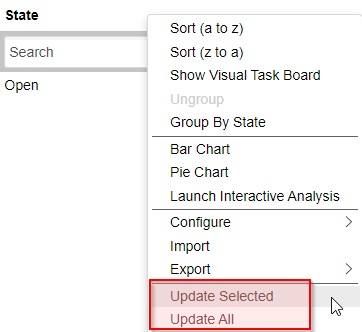
It took me some trial an error to figure out how this works. Easiest way: Create the query in the old platform and replace everything after query/… with the “copied query”
But if you want to open a specific record? You’ll need, as to my current knowledge, the sys_id. In another system you have no chance knowing the ServiceNow sys_id of a record. But maybe you know a “number”, eg. an account number, a case number or something like it.
Then you can use this approach:
- in UI Builder create a redirect page with optional parameters. These parameters could be: table and value
In my case it was type and customerno
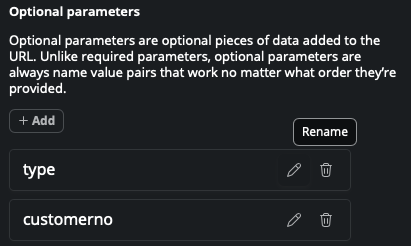
Now I could open any type of record(s) which can be identified by the customer number.
Add (a) client state(s) where you parse the required values from the URL you require in the datasource. If you use table field value as optional parameters, then you create for each of them an own client state.

In the page add an appropriate data source (lookup multiple records!!!!). In my example it was: getAccount, table Account, only when invoked (explicit).
ONLY in Look up multiple records data source you can define “conditions”. In Look up single record you have to provide sys_id.
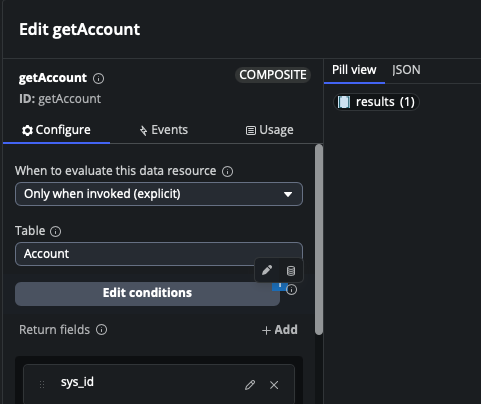
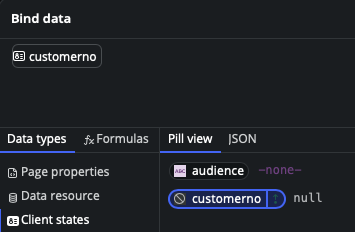
In the conditions I would filter account by customerno

where the customerno was to be found in a client state field, click the db icon to be able to bind data

and bind it to the client state
You could bind the table client state to the table property of the data source. You cannot bind the field name of the condition to a client state, unfortunately. So you have to kind of hard code that in the dataSource.
The client state(s) is/are set in a Client script
function handler({api, event, helpers, imports}) {
    api.setState('customerno', api.context.props.customerno);
}
The client script is called in the page ready of the body of the page
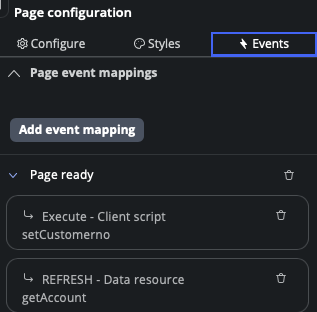
Also I call a “refresh” data source, as the client state (customerno) now is known, the required data can be fetched.
Here I am not 100% sure. I assume the events are executed sequentially. You can change the order if you go to Settings and then select Page definition
In the Internal Event Mapping you can change the order of the events
previously
{
    "MACROPONENT_READY": [
        {
            "broker": null,
            "clientScript": null,
            "conditional": null,
            "declarativeAction": null,
            "event": null,
            "operation": {
                "dataBrokerId": "b997a84053021010cbc2ddeeff7b1228",
                "operationName": "REFRESH",
                "parentResourceId": "getAccount",
                "payload": {
                    "type": "JSON_LITERAL",
                    "value": {}
                }
            },
            "targetId": "ezQoReehhZFBkffiijjiigBSmXbeeddeeddggs",
            "type": "DATABROKER_OP"
        },
        {
            "broker": null,
            "clientScript": {
                "payload": {
                    "type": "JSON_LITERAL",
                    "value": {}
                },
                "sysId": "d03c437f872e6a109dffa7950cbb35aa"
            },
            "conditional": null,
            "declarativeAction": null,
            "event": null,
            "operation": null,
            "targetId": "UEzODvonAUxyjjiiiOGeehhdcYddIA",
            "type": "CLIENT_SCRIPT"
        }
    ]
}
after
{
    "MACROPONENT_READY": [
        {
            "broker": null,
            "clientScript": {
                "payload": {
                    "type": "JSON_LITERAL",
                    "value": {}
                },
                "sysId": "d03c437f872e6a109dffa7950cbb35aa"
            },
            "conditional": null,
            "declarativeAction": null,
            "event": null,
            "operation": null,
            "targetId": "UEzODvonAUxyjjiiiOGeehhdcYddIA",
            "type": "CLIENT_SCRIPT"
        },
        {
            "broker": null,
            "clientScript": null,
            "conditional": null,
            "declarativeAction": null,
            "event": null,
            "operation": {
                "dataBrokerId": "b997a84053021010cbc2ddeeff7b1228",
                "operationName": "REFRESH",
                "parentResourceId": "getAccount",
                "payload": {
                    "type": "JSON_LITERAL",
                    "value": {}
                }
            },
            "targetId": "ezQoReehhZFBkffiijjiigBSmXbeeddeeddggs",
            "type": "DATABROKER_OP"
        }
    ]
}
As you see I changed the order of the two events: getAccount and client script
At this point you’ll have “traced” the optional parameters in the URL with the client script and refreshed your data source to find the record(s) you need.
now create another client script (redirect) where you direct (navigate) to the page in workspace you require
{

    if ('services' == api.context.props.type) {
        var customerno = api.context.props.customerno;
        helpers.navigate.to('simplelist', {'table':'cmdb_ci_service'},{'query': 'company.ref_customer_account.u_customer_number=' + customerno});

    } else if ('account' == api.context.props.type) {
        helpers.navigate.to('record', {'table':'customer_account','sysId': api.data.getAccount.results[0].sys_id.value}, {'selectedTabIndex' : 1});
    }
It took me a while to find the proper syntax to find the sys_id from the results in the data source. Also how I could select the “contacts” tab (first tab in account) to me a little while to figure out.
But when do you call the “redirect” client script?
In the Events in the data source. there’s an event “Data Fetch succeeded”
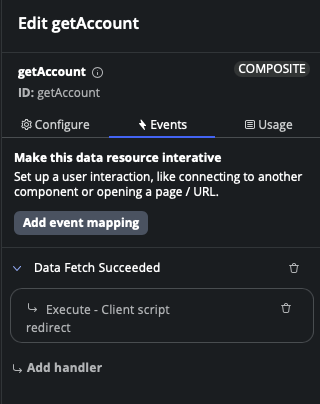
And for debugging purposes I’d recommend having a “logEvent” client script.
function handler({api, event, helpers, imports}) {
    console.log("yourPrefix->" + JSON.stringify(event, null, 4));
}
This logEvent client script you can call in any place you require more info about the result of an event. Then you can always use the Browser Debugger in the console and search for “yourPrefix->” to find interesting information. This Tip is kudos to Jesse (Debugging in UI Builder in ServiceNow) his Website
Now you can call from your other tool the URL like service-now.com/now/cwf/agent/redirect/params/type/account/customerno/20001753
This approach you could even use to create, pre-populated, records (incidents / cases)
Did you like my tutorial?