- create text you want to display in color, make it big and bold
- select the font frame and then “ObjectExpand”
- create several containers (squares) and copy color gradients from a gold bar into them, select them and use <i> to pick up a color from the gold bars and assign it to the container

- create a new gradient having about 8 sections and fill with those colors repeatingly

use the eye dropper tool to pick up the color from the containers to assign to the individual sections, keep <shift> pressed while doing so, otherwise the whole gradient will be filled with the picked up color
fill gradient
border/stroke gradient
- apply the newly created gradient to text
- use gradient tool <g> to “drag” the gradient into proper position: vertical/horizontal etc.


- assign a stroke to the text and expand (ObjectExpand) only the stroke (deselect “fill”)

- ungroup all twice, such that all the “borders” can be selected and applied the gradient fill
- select the borders (strokes) and assign a nice “colored” gradient, see above

Category: Illustrator
bookmark_bordercreating curved arrows in Illustrator (tutorial)
For my studies I had to create a nice little graphic with curved arrows and they should contain text in them. I thought Illustrator might be the tool to use. But admittedly I am not a hard-core Illustrator user and hence I had to dig a bit to find out more how to do this…
I found several suggestions but then at last I figured the most easy way is like this:
- Create a circle
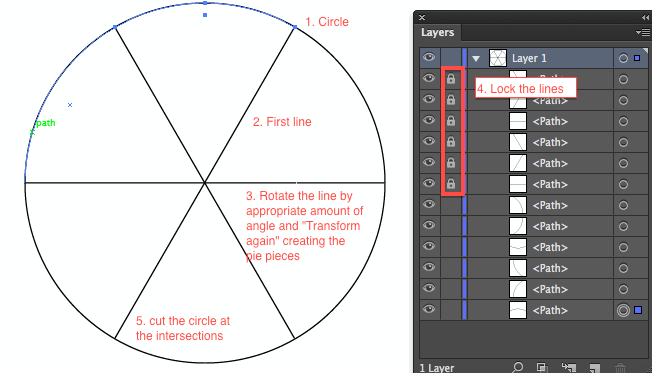
- Divide the circle into how many parts as you need arrows around it:
- Add a line from center of the circle to its circumference
- Rotate that line, create a copy, with the rotate tool by the amount of angle you need, pay attention that the rotating center is put onto the center of the circle, do this by (on the mac) <option>clicking the center of the circle, then add the angle and click the copy button
- (on the mac) press <command>d to repeat (Transform again) until the circle has as many “pie pieces” as you need
- cut the circle with the scissors tool on the intersection points of the lines with the circle, to make this easier you may first “lock” the lines in the layers palette
- remove the lines again
- select all bows and add an arrow brush to your liking
- tweak the arrows in width: use the “Options for selected objects…” under the brushes palette menu and the width tool to adjust the arrows to your liking
See Tutorial on the “variable width profile”
Screenshots:
 |
| Width tool to adjust the path width of the arrows |


